


Introduction
Hey everyone, Fariba here from WatchKnitting! I’m back with the fourth video in my brioche tutorial series. This time, we’re taking it up a notch with two-color brioche in the round! After lots of trial and error, I’ve worked out the best approach—from choosing the right size to the cast-on method—to make this magical, reversible pattern as simple as possible. So, give this video a thumbs-up and save it to your watchlist for later. Let’s stitch some magic together!
Materials
For two-color brioche in the round, you’ll need two different-colored yarns in the same weight. I’m using worsted-weight yarn. Unlike brioche worked flat, where one color tends to be more dominant, brioche in the round alternates evenly. Because of this, there’s no need to assign a dominant color. However, to make things easier to follow, I’ll still label them: the brighter color will be the main color (MC), and the other will be the contrast color (CC).
We’ll also need a circular needle, and I recommend going one size smaller than the suggested needle size for your yarn to create a more defined fabric. For example, I’m using a 3.5 mm circular needle instead of the 4.5 mm recommended for worsted-weight yarn, with a 16″ cable.
There are two methods to knit two-color brioche:
- Single-color cast-on transitioning into alternating colors – Covered in an older tutorial.
- Symmetrical Two-Color Brioche Cast-On – Uses both colors alternately from the start. This is what I’ll demonstrate in this video.
For a symmetrical cast-on, we’ll need an extra pair of needles (circular, double-pointed, or straight). These help in alternating stitches evenly. I’ll be using 3.5 mm straight needles.
You’ll also need a stitch marker. If you don’t have one, simply tie a small piece of yarn into a loop.
Stitch Count
If you’ve followed my brioche tutorials, you know I usually recommend casting on fewer stitches for brioche. However, for symmetrical two-color brioche in the round, we don’t reduce the stitch count because the alternating stitches create a very tight first row.
Instead of reducing stitches, I suggest using a lower gauge. Your usual tension will also affect the stretchiness of the pattern.
For example, a medium adult hat in worsted-weight yarn with 3.5 mm needles typically requires 96 stitches. However, for this demo, I’ll use 88 stitches for a smaller size. The one I worked earlier with 96 stitches still feels looser than a typical medium size but looks more defined and warm.
✨Cast-On Instructions for a Two-Color Brioche Hat (Using 3.5 mm Needles & Worsted Yarn)
Step 1: Determine Hat Size
Refer to the standard head circumference sizes:
- Baby (6–12 months): 14–16 inches (36–41 cm)
- Toddler (1–3 years): 16–18 inches (41–46 cm)
- Child (4–10 years): 18–20 inches (46–51 cm)
- Teen/Adult Small: 20–21 inches (51–53 cm)
- Adult Medium: 21–22 inches (53–56 cm)
- Adult Large: 22–24 inches (56–61 cm)
Since brioche stretches significantly, aim for a cast-on circumference about 2 inches (5 cm) smaller than the actual head size.
Step 2: Adjust Stitch Count for 3.5 mm Needles
With 3.5 mm needles, the gauge will be tighter than usual, so the number of cast-on stitches needs to be adjusted accordingly.
- Baby: 64 stitches
- Toddler: 72 stitches
- Child: 80 stitches
- Teen/Adult Small: 88 stitches
- Adult Medium: 96 stitches
- Adult Large: 104 stitches
For this demo, I’ll split 88 stitches evenly between the two colors (44 stitches each) and add one extra stitch to the main color. This extra stitch will be knit together in the setup round when joining the edge for a seamless finish.
Cast-On Method
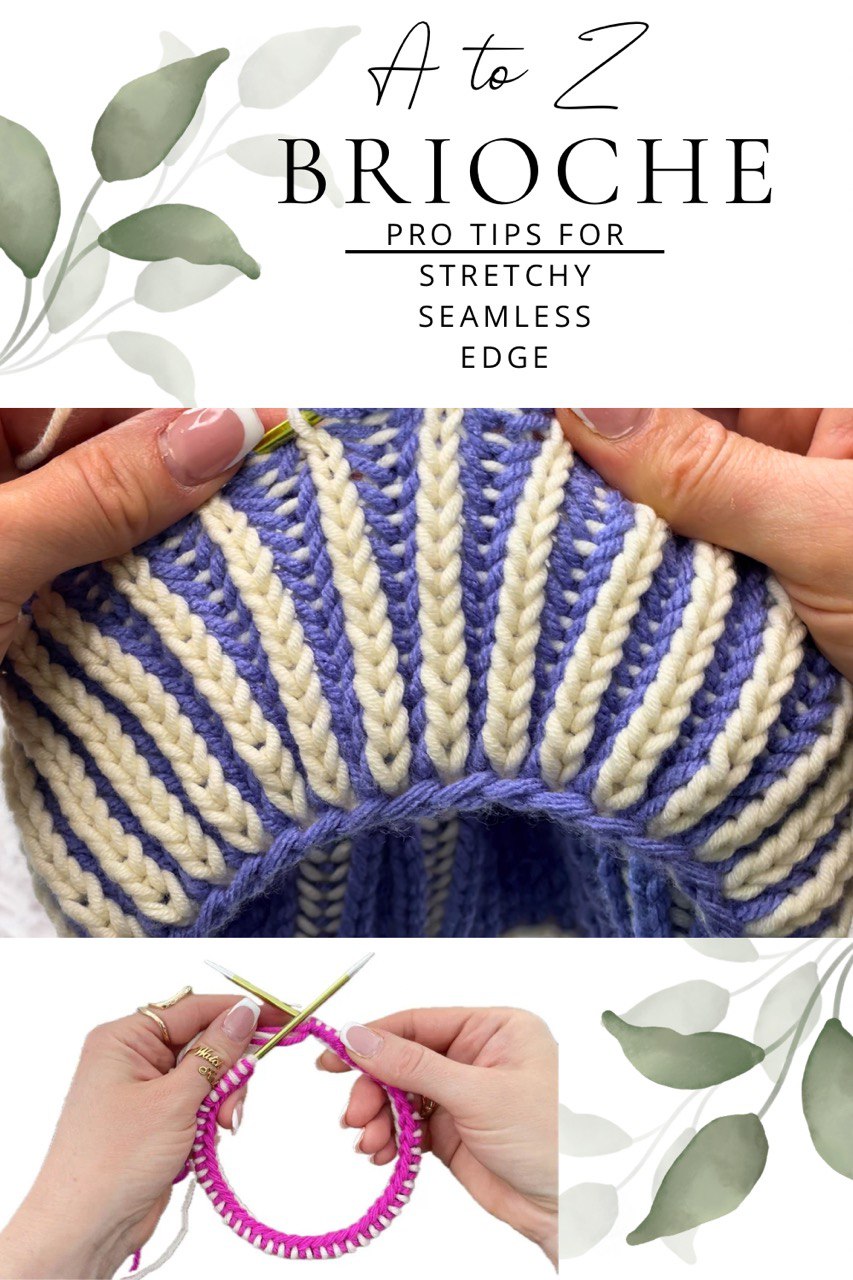
Let’s start with my Gap-Free Join Trick.
- Begin with the contrast color (CC). For each stitch, allow 1 inch (2 cm) of yarn. I measure about 40” (100 cm) for the tail.
- Use a double-needle cast-on for stretchiness but start and end with a single needle to avoid loose stitches.
- Cast on two stitches. Then, switch to your main needle to create larger loops for flexibility.
- Keep the cast-on loose to prevent a tight edge.
- Remove the circular needle, switch to a single needle, and cast on two more stitches, bringing the total to 44 stitches. Tie the end.
- Repeat with the main color (MC), casting on 44 stitches plus one extra stitch.
- Position both needle tips to the right. Begin picking up stitches with the circular needle, alternating colors.
- This method blends colors symmetrically, creating a structured and visually balanced foundation.
- The start and end should be in the main color due to the extra stitch.
Setup Round & Stitch Pattern
Two-color brioche in the round begins with one setup row in the main color, followed by a two-round repeat.
Since we didn’t reduce the cast-on count, there are enough stitches to join in the round.
Setup Round
- The setup round starts with the main color (MC).
- Ensure your stitches aren’t twisted and the working yarn is on your right needle.
- Transfer the extra stitch to the left needle, place a stitch marker, and knit two together.
- Begin the repeat: Knit 1, Sl1Yo (slip one yarn over).
- Continue until the end of the round. Finish with Sl1Yo, leaving the yarn at the back.
Round 1 (Contrast Color – CC)
- Start with Sl1Yo.
- Purl the paired stitches together (BrP – Brioche Purl).
- Repeat Sl1Yo, BrP across the round.
- Finish with P2tog. Transfer the marker.
Round 2 (Main Color – MC)
- Start with BrK (Brioche Knit – K2tog).
- Follow with Sl1Yo.
- Repeat BrK, Sl1Yo until the end.
- The main color always works the knit round, and the contrast color always works the purl round.
Key Tips
- Sl1Yo is always worked over the opposite color.
- Single stitches are Sl1Yo, paired stitches are BrK or BrP.
- When a single stitch is knit, the next step is BrP.
- When a single stitch is purl, the next step is BrK.
- The stitches before and after the marker are treated the same.
Tracking Your Progress
- If the first stitch after the marker is a purl stitch, it’s a knit round.
- If the first stitch after the marker is a knit stitch, it’s a purl round.
- The contrast color always works the purl round, and the main color always works the knit round.
Final Thoughts
I’ve put a lot of effort into making this tutorial as clear and easy to follow as possible. I hope you’ve enjoyed learning with me! If anything is unclear, feel free to ask in the comments below.
Stay tuned for my next two-color brioche tutorial, where I’ll cover increasing and decreasing in brioche! Have a wonderful day and happy knitting! 🧶


Leave a Reply