


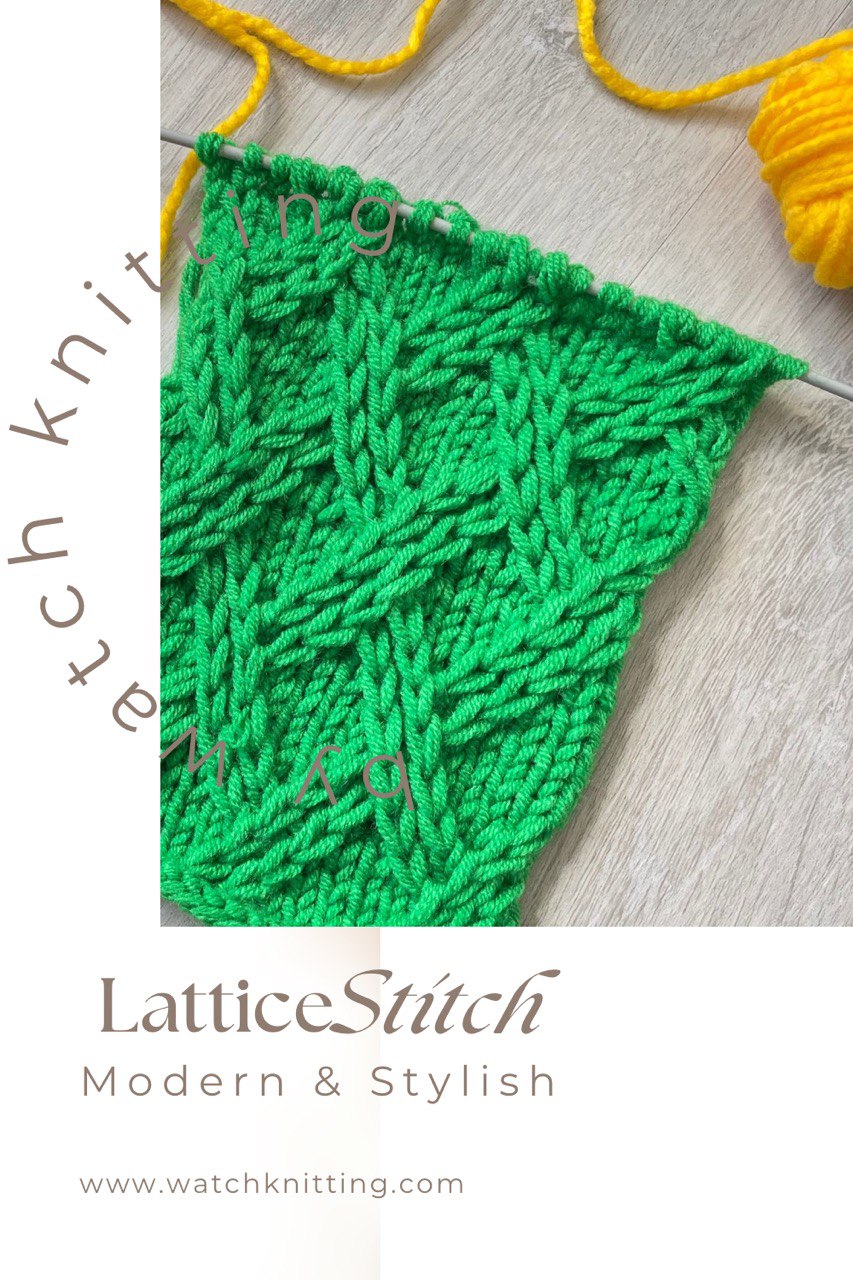
Hello, friends! Fariba here from WatchKnitting. Today, I’m excited to share the instructions for this stunning lattice pattern. It took me a couple of days to figure it out, but now it’s ready for you to try!
Before We Start: Tips for the Best Results
- Choose a yarn with a higher wool content or one that grips well, as this pattern involves a lot of stitch crossing.
- The pattern tends to compress as it grows, so using a low steam at the end will help relax and shape it nicely.
- Consider adding extra edge stitches to help the piece lay flat.
Getting Started
- This pattern is worked in multiples of 8 stitches. I recommend adding an extra 6 stitches for the side edges.
- It is completed in 16 rows. Don’t worry—it’s easier than it looks since all odd-numbered rows are purled.
- All stitches on the right side are knitted, and those that cross over are slipped.
Pattern Instructions
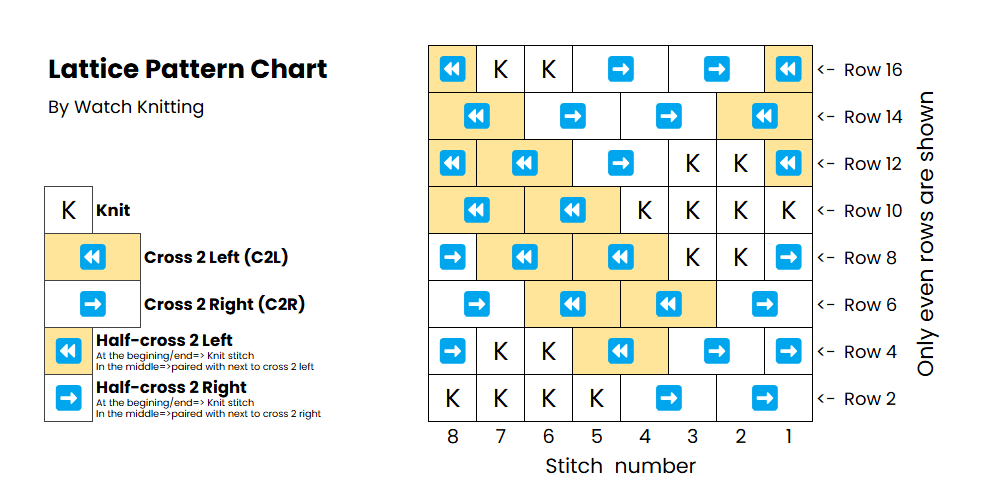
Row 1,3,5,7,9,11,13,15 (WS): Purl across, with 3 knit stitches at both edges for garter.
Row 2 (RS): Rep [(2*C2R), K4]
Row 4 (RS): K1, C2R, C2L, K2, then Rep [(2*C2R), C2L, K2], K1
Row 6 (RS): Rep [C2R, (2*C2L),C2R]
Row 8 (RS): K3, (2C2L), then Rep [C2R, K2, (2C2L)], K1
Row 10 (RS): Rep [ K4, (2*C2L)]
Row 12 (RS): K3, C2R, C2L, then Rep [C2L, K2, C2R, C2L], K1
Row 14 (RS): Rep [C2L, (2*C2R),C2L]
Row 16 (RS): K1, (2C2R, K2), then Rep [C2L,(2C2R), K2], K1
Chart Tips In the chart, arrows inside a single square indicate a half cross stitch which is performed as knit stitch at the beginning or end of a row. In the middle repeat, that stitch will pair with the next one to form either a C2R or C2L, depending on the direction.
C2R: For Cross 2 Right, both stitches are transferred to the right needle. The right stitch is grabbed from the back with the left needle, and the other stitch is dropped. The dropped stitch is then picked up with the right needle. Since this stitch was only slipped, it is left on the right needle. Finally, the second stitch is knitted.
C2L: For the left cross, both stitches are transferred to the right needle. Then, the right stitch is grabbed from the front using the tip of the left needle, and the other stitch is dropped. The dropped stitch is slowly picked up with the right needle, and both stitches are placed back onto the left needle. At this point, the stitches are crossed. The first stitch (now at the back) is then knitted, and the second stitch (now on top) is slipped.
I hope you give this pattern a try! It may be a little complicated, but I tried my best to make it easy to follow. Honestly, the design that comes out is so stunning, you’ll definitely want to make it. I hope you find it helpful—feel free to reach out if you have any questions, or send me pictures of your project. I’d love to see your work!
Stay tuned for more, and enjoy your knitting time! 🧶✨

Leave a Reply