


 Part 2
After working enough rows to reach to the thumb row, approximately 5.5 inch from cast on edge, you will need to mark 16 stitches for small glove, or (18/20/22) for (M/L/XL), to create the thumb on it later. The instruction for left hand and right hand will be slightly different.
Left hand:
The working yarn should be in the side where the cuff seaming line is placed. ( If yours is in the other side, knit one more row to get to the other side or do your right hand first).
Instruction:
Knit 32 stitches following the previous instruction as (K1, Sl1)/(Sl, K1), to get to the last 16 stitches.
Get the scrap yarn and put it alongside with the original working yarn, hold it with right thumb. You are going to use the scrap yarn instead of using the original working yarn for these last 16 stitches. While both strings are in the back, knit the first stitch using the scrap yarn, move both strings to the front, slip the next stitch, again move both strings to the back, knit the next stitch using the scrap yarn, move both strings to the front, slip the next stitch. (see important note below)
Note: it is very important to move BOTH string while doing slip and knit.
Right hand:
The working yarn should be in the opposite side of where the cuff seaming line is placed. ( If yours is in the other side, knit one more row to get to the other side or do your left hand first).
Instruction:
Opposite the left hand, the scrap yarn is used in the beginning of the row. Get the scrap yarn and put it alongside with the original tail, and hold it with right thumb. You are going to use the scrap yarn instead of using the original working yarn for 16 first stitch in this row. while both strings are in the back, knit the first stitch using the scrap yarn, move both strings to the front, slip the next stitch, again move both strings to the back knit the next stitch using the scrap yarn, move both strings to the front, slip the next stitch. Note: it is very important to move BOTH string while doing slip and knit. Knit the next 32 stitches following the previous instruction as (K1, Sl1)/ (Sl, K1), using the original working yarn. (see important note above)
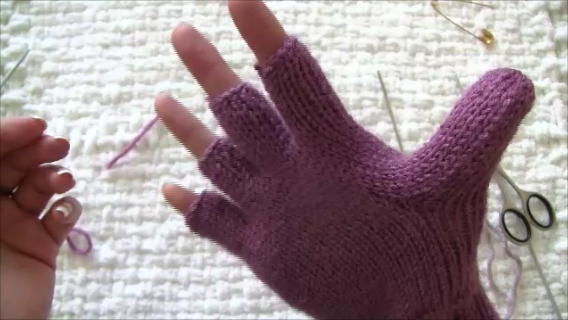
Continue to knit using the original yarn for another 2.5 inch or until you feel it is enough to make fingers.
What is next:
Part 3: how to make fingers
Other links:
Part 1: how to start gloves
Part 4: how to make thumb
Part 5: how to make flip cups and finishing


Leave a Reply