My name is Fariba. Knitting is my passion since I was a little kid.

  • Tutorial 1 – how to cast on
    The first step of knitting is casting on. Casting on means making the base row of loops that will allow us to make a knit fabric by connecting new loops in following rows. The number of loops that you need to cast on depends on the project you wanna work on and also on your yarn size.  As you… Read more: Tutorial 1 – how to cast on
  • Stockinette stitch
    The very simple fabric that is made of basic knit and purl stitches is called stockinette stitch. It means after you cast on number of stitches, you knit the first row with Knit stitch and knit the second row (return row) with Purl stitch. You repeat to do Knit stitch for all odd rows, like row… Read more: Stockinette stitch
  • Stitch 1- Basic Rib Stitch
    Made in a multiple of 2 stitches, and 2 row repeat. Row 1) Rep (k1, p1) Row 2) Rep (p1, k1) Here is the short grid to help you with it:              
Silk & Sequin Yarn Combo Top

You HAVE to Try This Silk & Sequin Yarn Combo Top✨

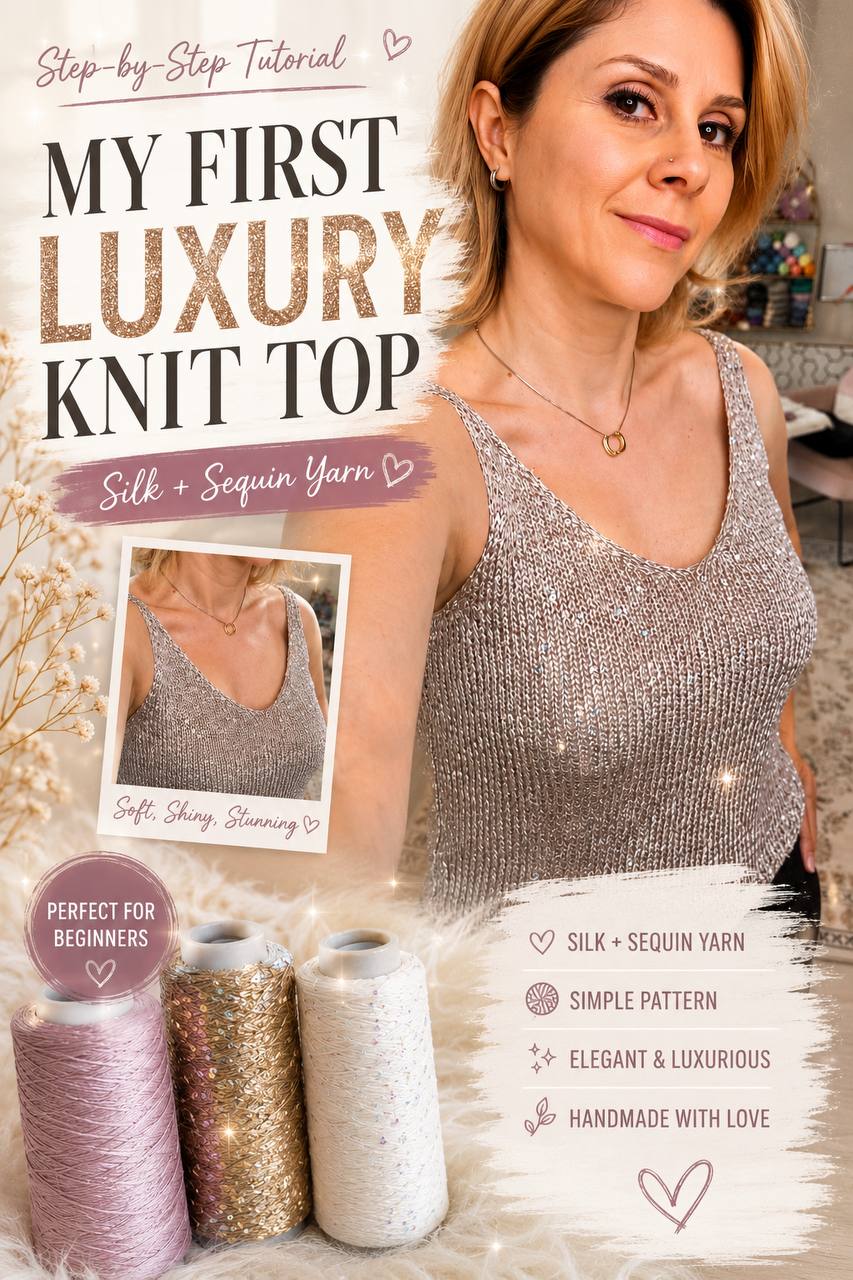
If you’ve never tried knitting with sequin yarn before, this is the perfect project to start with!

In this tutorial, I combined soft silk yarn with sparkly and Mercerized sequin yarn to create a lightweight and elegant knit top with a beautiful texture and shine. Even though sequin yarn can look intimidating at first, the result is absolutely worth it. ✨AND IT’s NOT SCRATCHY AT ALL! 👌😊

This pattern is worked flat and includes simple shaping techniques, i-cord edges, and clean side attachment methods to make finishing easier and neater.

The front and back panels are worked the same.


Materials Used


Main Body

  • Cast on 80 stitches.
  • Work 4 rows in 2×2 rib stitch.
  • Continue working flat in stockinette stitch with edge technique (see below)

Edge Technique

Work the third stitch from the beginning and the third stitch from the end of each row in the opposite pattern. This creates edge bars that make side attachment easier and cleaner when sewing the sides together later.

Work approximately 70 rows.

Measurements

  • Width: 39 cm (15 inches) after light stretching
  • Length: 30 cm (12 inches)

Strap Shaping (Right Side)

Separate stitches into two equal sections.

Row 1: K37, sl3 wyib.
Row 2: P3, p2tog, P35.
Row 3: BO 5, K31, sl3 wyib.
Row 4: P3, p2tog, P26, sl3 wyif.
Row 5: K3, k2tog, K25, sl3 wyib.
Row 6: P3, p2tog, P24, sl3 wyif.
Row 7: K28, sl3 wyib.

Keep decreasing at the neckline side every row.

Decrease at the underarm side every other return row.

  • Continue shaping until 10 stitches remain on the needles.
  • Continue working straight for approximately 3.5 inches while still maintaining the i-cord edge technique on both sides.
  • Bind off loosely.

Strap Shaping (Left Side)

Attach new yarn from SIDE to start with return row with the second half of stitches.

Row 1: P37, sl3 wyif.
Row 2: K3, k2tog, K35.
Row 3: BO 5, P31, sl3 wyif.
Row 4: K3, k2tog, K26, sl3 wyib.
Row 5: P3, p2tog, P25, sl3 wyif.

Row 6: K3, K2tog, K24, sl3 wyib.
Row 7: P28, sl3 wyif.

  • Continue shaping until 10 stitches remain on the needles.
  • Continue working straight for approximately 3.5 inches while still maintaining the i-cord edge technique on both sides.
  • Bind off loosely.

Finishing

  • Attach the sides using the edge bars created along the sides.
  • Weave in all ends carefully, especially around the sequin yarn.

The final fabric has a soft drape with a subtle sparkle that looks beautiful for summer outfits or layering pieces.

If you try this project, let me know how it turns out ✨


Comments

Leave a Reply

Your email address will not be published. Required fields are marked *

Free knitting tutorials