


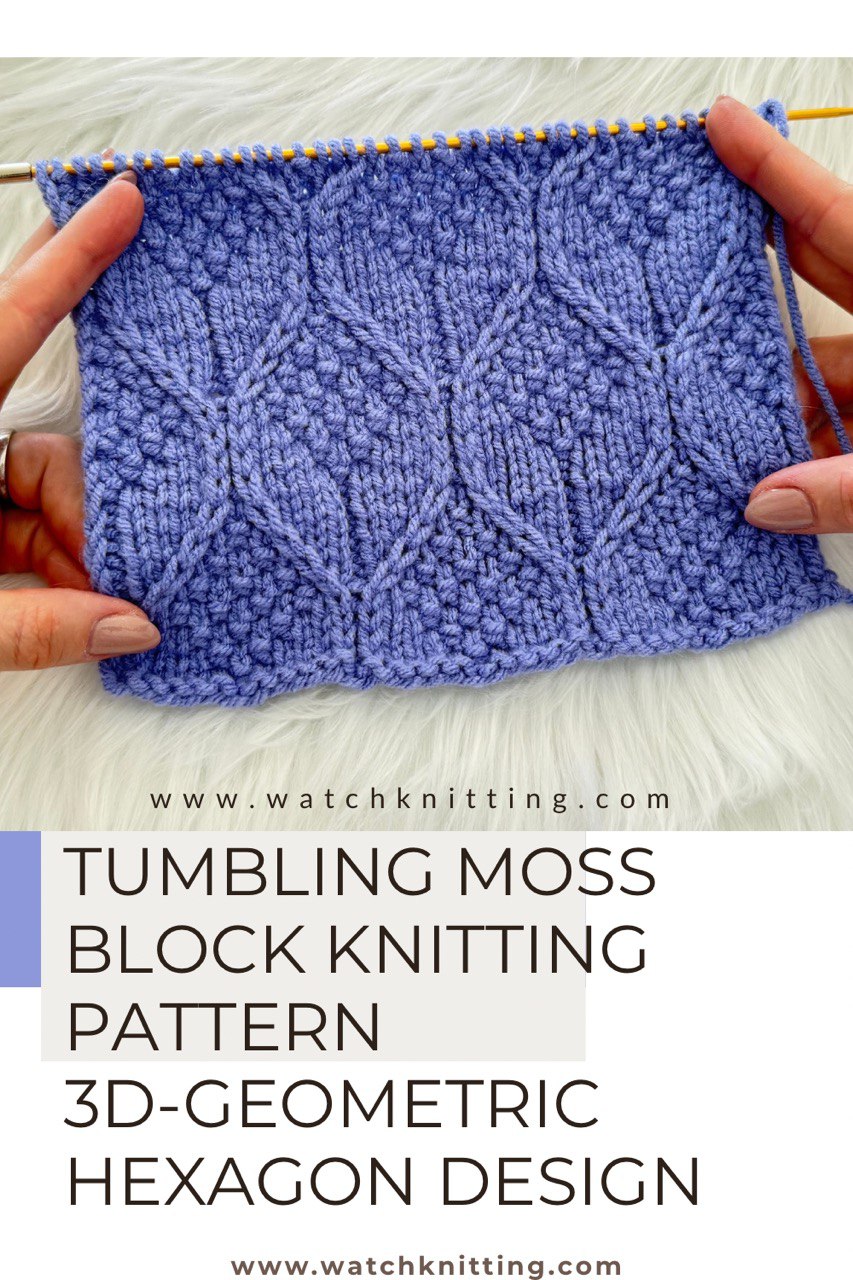
Welcome back to WatchKnitting! I’m Fariba, and in today’s tutorial, I’ll guide you through knitting a stunning 3D geometric stitch pattern that I designed myself. This textured motif creates a bold, hexagonal structure that appears to shift and tumble — a perfect visual illusion crafted entirely with stitches!
🧶 Pattern Details
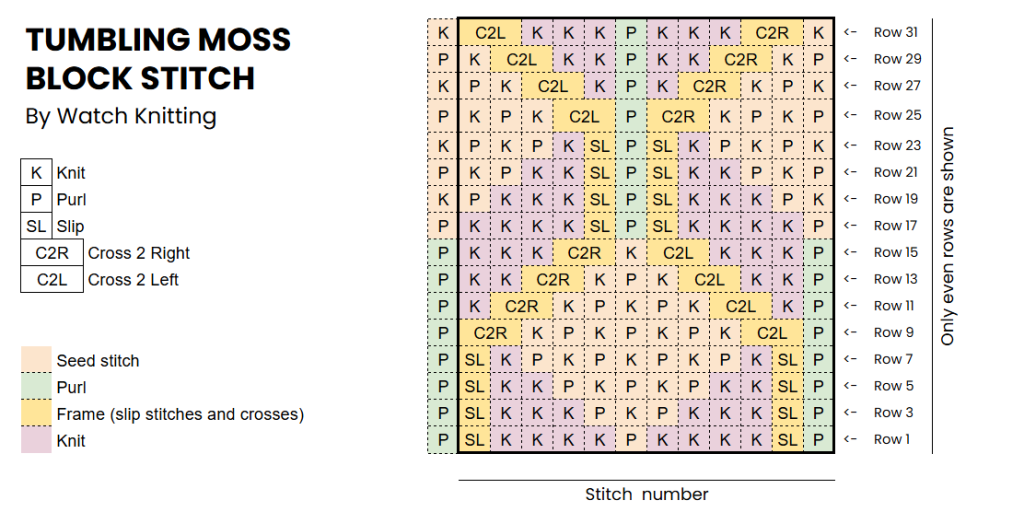
- Stitch multiple: 12 + 3
- Row repeat: 32 rows
- Back-side rows: Work stitches as they appear (knit the knits, purl the purls)
✨ Pro tip: Using slightly smaller needles than recommended for your yarn can enhance stitch definition, especially for textured patterns like this.
🔁 Understanding the Structure
Each motif starts from the center of a hexagon, framed by slipped-stitch lines. As you knit, the central purl stitch expands into a seed stitch section, while the surrounding knit stitches decrease, creating a tumbling block effect. The design is further enhanced by crossed stitches that tilt the vertical lines diagonally, adding a dynamic, geometric illusion.
Before we dive in, here are a few structural elements to note:
- Motifs are separated by 1 purl stitch
- Slip stitches form the borders of each motif
- Seed stitch sections grow gradually from 1 to 7 stitches and then reduce again, mimicking a diamond-shaped texture
Pattern Instructions:
Row 1 (RS): edge, rep [P1, SL1, K4, SD1 (P1), K4, SL1], P1, edge
Row 2 (WS): edge, rep [K1, P5, SD1 (K1), P5], K1, edge
Row 3 (RS): edge, rep [P1, SL1, K3, SD3 (P1, K1, P1), K3, SL1], P1, edge
Row 4 (WS): edge, rep [K1, P4, SD3 (K1, P1, K1), P4], K1, edge
Row 5 (RS): edge, rep [P1, SL1, K2, SD5 ((P1, K1)×2, P1), K2, SL1], P1, edge
Row 6 (WS): edge, rep [K1, P3, SD5 ((K1, P1)×2, K1), P3], K1, edge
Row 7 (RS): edge, rep [P1, SL1, K1, SD7 ((P1, K1)×3, P1), K1, SL1], P1, edge
Row 8 (WS): edge, rep [K1, P2, SD7 ((K1, P1)×3, K1), P2], K1, edge
Row 9 (RS): edge, rep [P1, C2L, SD7 ((K1, P1)×3, K1), C2R], P1, edge
Row 10 (WS): edge, rep [K1, P2, SD7 (P1, K1)×3, P1), P2], K1, edge
Row 11 (RS): edge, rep [P1, K1, C2L, SD5 ((K1, P1)×2, K1), C2R, K1], P1, edge
Row 12 (WS): edge, rep [K1, P3, SD5 ((P1, K1)×2, P1), P3], K1, edge
Row 13 (RS): edge, rep [P1, K2, C2L, SD3 (K1, P1, K1), C2R, K2], P1, edge
Row 14 (WS): edge, rep [K1, P4, SD3 (P1, K1, P1), P4], K1, edge
Row 15 (RS): edge, rep [P1, K3, C2L, SD1 (K1), C2R, K3], P1, edge
Row 16 (WS): edge, rep [K1, P5, SD1 (P1), P5], K1, edge
Row 17 (RS): edge, rep [SD1 (P1), K4, SL1, P1, SL1, K4], P1, edge
Row 18 (WS): edge, rep [SD1 (K1), P5, K1, P5], SD1 (K1), edge
Row 19 (RS): edge, rep [SD2 (K1, P1), K3, SL1, P1, SL1, K3, SD1 (P1)], K1, edge
Row 20 (WS): edge, rep [SD2 (P1, K1), P4, K1, P4, SD2 (K1, P1)], edge
Row 21 (RS): edge, rep [SD3 (P1, K1, P1), K2, SL1, P1, SL1, K2, SD2 (P1, K1)], P1, edge
Row 22 (WS): edge, rep [SD2 (K1, P1, K1), P3, K1, P3, SD3 (K1, P1, K1)], edge
Row 23 (RS): edge, rep [SD4 ((K1, P1)×2), K1, SL1, P1, SL1, K1, SD3 (P1, K1, P1)], K1, edge
Row 24 (WS): edge, rep [SD4 ((P1, K1)×2), P2, K1, P2, SD3 (K1, P1, K1)], P1, edge
Row 25 (RS): edge, rep [SD4 ((P1, K1)×2), C2R, P1, C2L, SD3 (K1, P1, K1)], P1, edge
Row 26 (WS): edge, rep [SD4 ((K1, P1)×2), P2, K1, P2, SD3 (P1, K1, P1)], K1, edge
Row 27 (RS): edge, rep [SD3 (K1, P1, K1), C2R, K1, P1, K1, C2L, SD2 (K1, P1)], K1, edge
Row 28 (WS): edge, rep [SD3 (P1, K1, P1), P3, K1, P3, SD2 (P1, K1)], P1, edge
Row 29 (RS): edge, rep [SD2 (P1, K1), C2R, K2, P1, K2, C2L, SD1 (K1)], P1, edge
Row 30 (WS): edge, rep [SD2 (K1, P1), P4, K1, P4, SD1 (P1)], K1, edge
Row 31 (RS): edge, rep [SD1 (K1), C2R, K3, P1, K3, C2L], K1, edge
Row 32 (WS): edge, rep [P6, K1, P5], P1, edge
🧶 Abbreviation Guide
SD stands for seed stitch: Seed stitch alternates knit and purl stitches; to work it, just knit the purls and purl the knits.
For C2R, while the yarn is at the back, transfer both stitches to your right needle. Then, insert the tip of your left needle from the back to the first stitch, pulling the right needle out. Drop the second stitch from the needle and pick it up again with your right needle. Now the two stitches are crossed, with the top stitch leaning to the right. Slip the top stitch without knitting and keep it on your right needle. Then, knit the second stitch, which is now at the back.
For C2L, while the yarn is at the back, transfer both stitches to your right needle. Then, using the tip of your left needle, insert it from the front to the second stitch and drop the first stitch from the needle. Pick up the dropped stitch with your right needle and place it back onto the left needle. Now, knit the first stitch (which is now at the back), and slip the second stitch (which is now on top).
✳️ Visual Texture
The texture evolves from flat knit sections into raised, interlocking blocks. The combination of slip stitches, seed stitch, and directional crossings creates the illusion of 3D tumbling cubes. With fine yarn and tight gauge, the detail is crisp and architectural. With thicker yarn, the texture is bold and graphic.
🎥 Watch the Full Tutorial
In the video, I walk you through:
- Setting up the first few rows
- Working through seed stitch transitions
- Creating directional crosses
- Offsetting motifs for continuous flow
Whether you’re knitting a scarf, panel, or statement blanket, this pattern adds stunning depth and texture.
📌 Final Notes
- Gauge and needle size play a huge role in how defined your motifs appear.
- For a more subtle look, use tonal or solid yarns.
- Try blocking your finished fabric to enhance the 3D effect.
Let me know in the comments how you plan to use this pattern, and don’t forget to tag your projects with #WatchKnitting so I can see your beautiful creations!
Happy knitting! 🧶💫
— Fariba
📥⬇️ Click below to download the PDF
#KnittingPattern #TexturedKnitting #3DKnitting #GeometricKnitting #KnittingTutorial #SeedStitch #CrossingTechniques #KnittingDesign #KnittingForBeginners #KnittingIdeas #KnittingPatterns #TexturedDesign #KnittingTips #FaribaKnits #WatchKnitting


Leave a Reply to W. Roos Cancel reply