


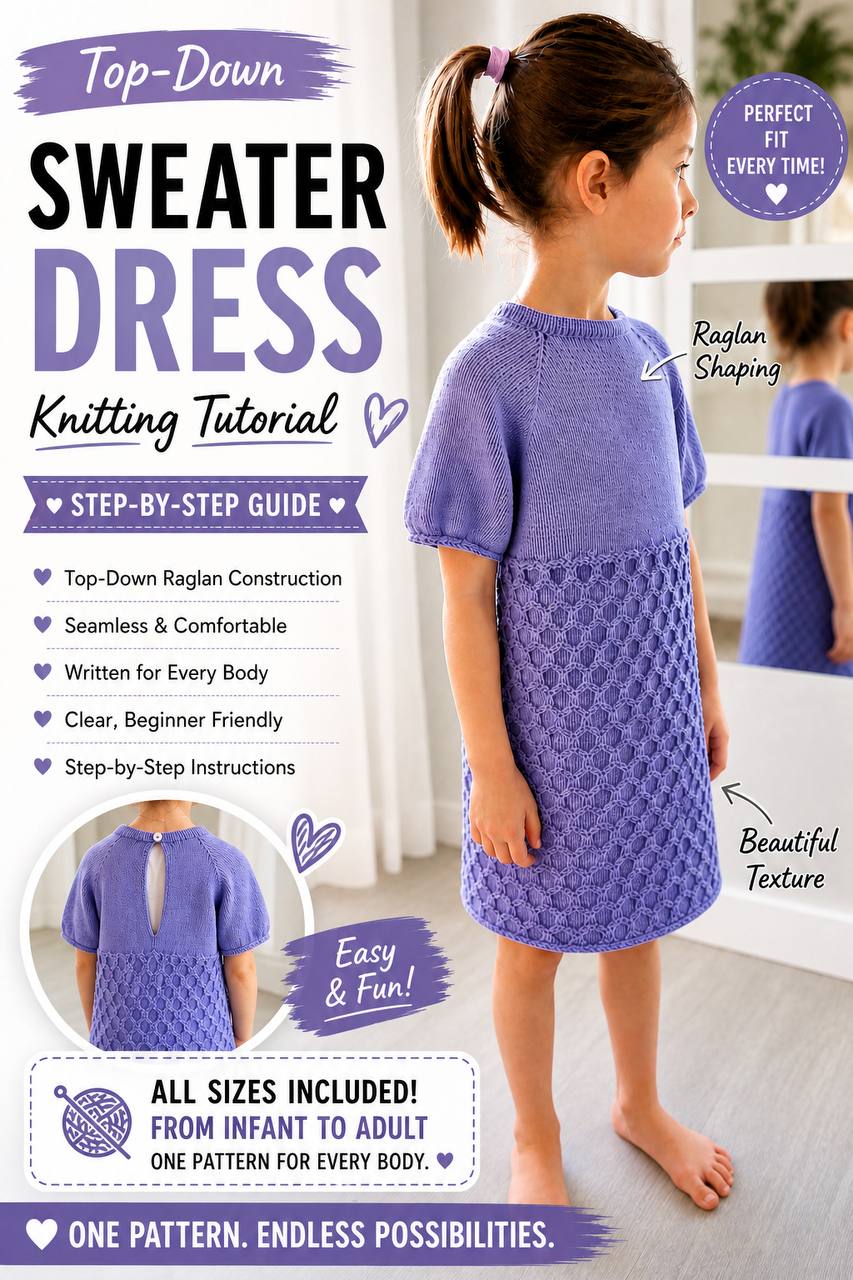
✨ Introduction
If you’ve ever struggled with sweater sizing, this tutorial will change everything.
In this step-by-step guide, you’ll learn how to knit a top-down sweater with a perfect fit, using a simple method that works for infants, kids, and adults.
This design features:
- A back opening (perfect for kids)
- A beautiful scallop stitch pattern
- A fully customizable sizing method
- Beginner-friendly construction
This sweater was made as a sweater dress, but you can easily adapt it to any length or style.
🧶 Materials You’ll Need
- Yarn (size 3) 265 g I used
- Circular needles (2.5 mm – 2.75 mm used here) 16″-48″
- Measuring tape
- Stitch markers
- Tapestry needle
- Crochet hook
- Scissors
- Calculator (for sizing)
💡 You can use straight needles, but circular needles are easier for large stitch counts.
📏 Step 1: How to Calculate the Perfect Size
1. Measure the Neck
Choose your neck circumference based on the wearer:
- Infant: smaller range
- Kids: medium range
- Adults: larger range
📏 Neck Circumference Guide (Approx.)
👶 Infant (0–12 months) 26–30 cm Prefer open neck (buttons/back opening)
🧸 Toddler (1–3 years) 28–32 cm Semi-open or stretchy works best
🧒 Child (3–6 years) 30–34 cm
👦 Older Child (6–10 years) 32–38 cm
👩 Teen (10–14 years) 36–42 cm
🧑 Adult 40–50 cm (Women: ~40–46 / Men: ~44–50)
📝 Notes • Pullover (closed neck): go with the higher end • Open neck (buttons/back): go with the lower end • Low stretch yarn: add about 2–3 cm
👉 Example used: 36 cm (child size with back opening)
2. Find Your Gauge
Measure how many stitches you have in 10 cm.
👉 Example:
- 25 stitches = 10 cm
3. Calculate Cast-On Stitches
Formula:
(stitches per 10 cm × desired cm) ÷ 10👉 Example:
25 × 36 ÷ 10 = 90 stitches4. Adjust for Construction
- Minus 4 stitches (for increases)
- Minus 4 stitches (for back opening)
👉 Final: 82 stitches
🧵 Stitch Distribution
Divide stitches into sections:
- Front: 1/3 → 28 stitches
- Sleeves: each ~14 stitches
- Back: remaining (~15 stitches each side)
Structure:
Back – Sleeve – Front – Sleeve – Back🪡 Neck Construction
- Cast on stitches
- Work stockinette stitch (flat) for 5 rows
- Add a knit row fold line (row 6)
- Work stockinette stitch (flat) for another 5 rows
- Fold and knit together for a clean edge
💡 This creates a professional folded neckline
➕ Raglan Increases
At each marker:
- Yarn over
- Slip center stitch
- Yarn over
On return row:
- Purl carefully to maintain structure
This creates:
✔ Clean increase lines
✔ Structured raglan shaping
🔗 Joining the Body
- Separate sleeves onto holders
- Join front and back
- Start working in the round
📈 Body Increases
Increase every 5 stitches for one row only:
- Knit 5 → increase 1
Adjust stitch count to:
👉 Multiple of 6 (for pattern)
Example:
- 206 → reduce to 204 stitches
🧵 Pattern: Scallop Stitch (Multiple of 6)
Pattern Sequence:
- 2 rounds purl
- Repeat 5 rounds:
- Knit 4, slip 2 (yarn in back)
- 1 round knit
- 2 rounds purl
Offset Section:
- Knit 1, slip 2, knit 4
- Repeat
💡 This creates the textured scallop effect
🧥 Sleeves
- Pick up stitches from holder
- Add ~6 stitches at underarm
- Knit in the round
Length:
- Example: 2.5 inches (short sleeve)
🔻 Sleeve Decreases
- Decrease every 3 stitches
- Knitwise + purlwise technique
- Second decrease round (stacked decreases every 2 stitches)
✨ Finishing the Sleeve
- Knit 3 plain rounds
- Create decorative edge:
- Lift bar between the second and thirs loop below the stitch
- Knit together with the stitch
- Bind off (purl bind off)
🧷 Finishing Touches
- Add zipper or buttons (optional)
- Hide yarn ends
- Block lightly if needed
💡 Tips for Best Results
- Always make a gauge swatch
- Use circular needles for comfort
- Keep stitch counts multiples of 6
- Try on as you go (top-down advantage!)
❤️ Final Thoughts
This is one of the easiest and most flexible ways to knit a sweater.
Once you understand:
- Gauge
- Stitch distribution
- Raglan increases
You can create perfect-fit sweaters every time — no guessing needed.
📌 Keywords
top down sweater tutorial, how to knit sweater, sweater sizing guide, knitting for beginners, raglan sweater, scallop stitch knitting, easy sweater pattern, knit sweater step by step
💬 Have Questions?
Drop your questions in the comments — I’m happy to help!

Leave a Reply