


Hello and welcome!
Fariba here from WatchKnitting 🧶
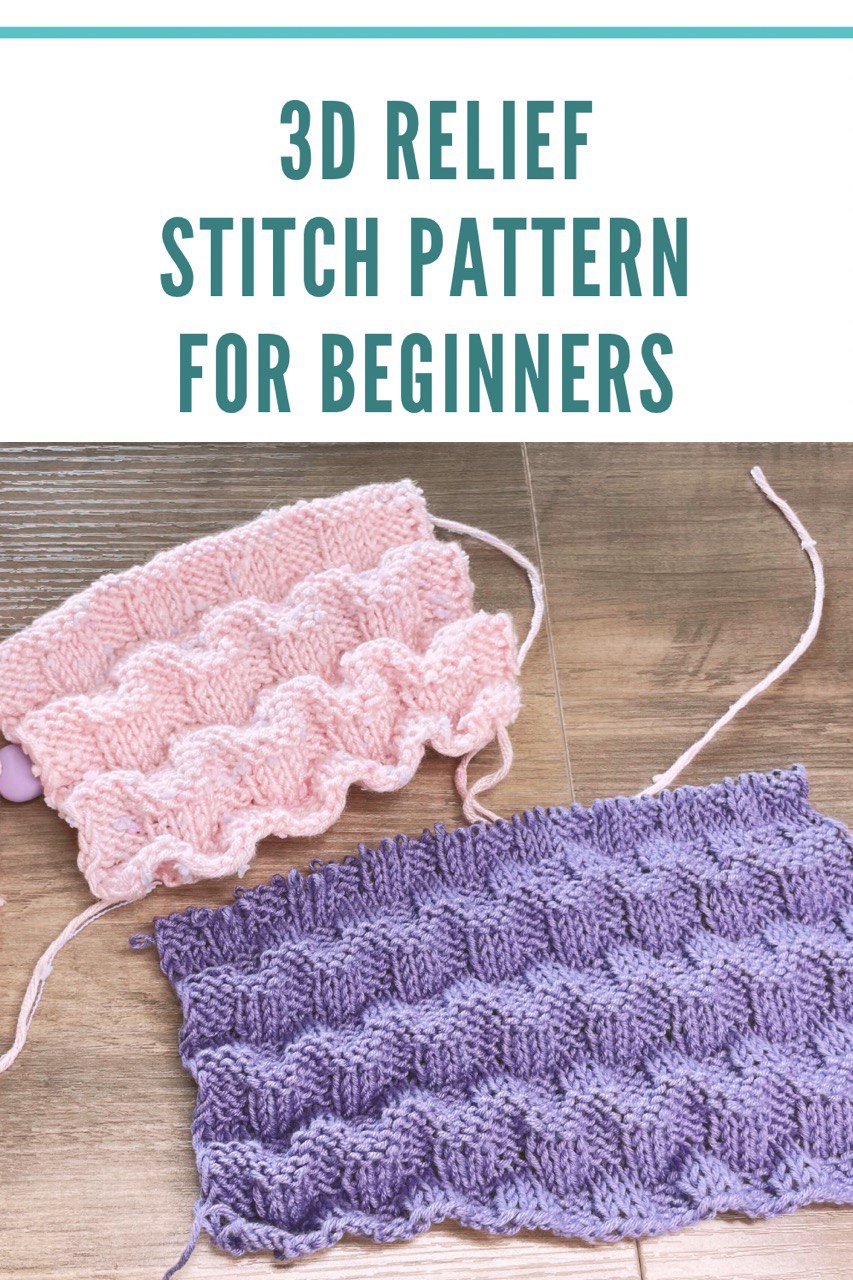
Today, I’m sharing a beginner-friendly pattern that’s super easy to knit using only basic stitches. It creates a beautifully textured, reversible fabric—and best of all, it’s fully customizable depending on your yarn and stitch count.
✨ The pattern is made in multiples of 6 + 3 + 2 with a 12-row repeat
🔹 Rows 1–3: Ribbing
- Row 1 starts with an edge stitch, then we repeat: Knit 3, Purl 3 across the row. End with Knit 3 and your edge stitch.
- For all rows, I slip the edge stitch at the start and knit it at the end to keep the edges neat.
- Row 2: Start with Purl 3, Knit 3, repeat across. End with Purl 3 and the edge stitch.
- Row 3: Same as Row 1—Knit 3, Purl 3 across. Finish with Knit 3 and the edge stitch.
By now, the rib pattern should feel smooth and familiar!
🔹 Rows 4–6: Stockinette
- Row 4: Purl across
- Row 5: Knit across
- Row 6: Purl across
Quick tip: check the first 3 stitches to confirm your row direction—it’s an easy way to stay on track.
This completes the first 6 rows and sets the stage for the offset rib section.
🔹 Rows 7–9: Offsetting Rib
To add texture, we now flip the rib starting point:
- Row 7: Start with Purl 3, Knit 3 across. This intentional offset creates the reversible effect. End with Purl 3 and edge stitch.
- Row 8: Knit 3, Purl 3 repeat across. End with Knit 3 and edge stitch.
- Row 9: Back to Purl 3, Knit 3 across. Finish with Purl 3 and edge stitch.
🔹 Rows 10–12: Stockinette
- Row 10: Knit across
- Row 11: Purl across
- Row 12: Knit across
🎉 That’s the full 12-row repeat! You can continue repeating from Row 1 as many times as you’d like.
This pattern creates a gorgeous texture using only basic stitches. It’s ideal for scarves, blankets, skirts, or even as a decorative border for larger projects.
Thanks so much for knitting along with me!
Stay cozy, stay creative—and see you soon for more fun tutorials 💕
—Fariba @WatchKnitting

Leave a Reply