


Ombre projects
Knitting world is changing every day by introducing new designs. One of these popular designs that has been around for a while now is called ombre knitting.
Ombre knitting is a technique in which color of the project is gradually changing from one color to another. There are plenty of methods to create ombre projects. Below I will talk about two techniques that are common ways of creating these projects. In first technique the ombre project is made because of the ombre color of the yarn itself, while in the second technique the ombre project is made by using plain color of yarns.
Technique 1: DYING YARN TO OMBRE
This technique could be as simple as one ball of yarn having color transition from one color in one end and the other color at the other end, or could be number of balls or strands dyed gradually from one color to another color in palette of colors. There are number of ready-to-knit ombre yarns sold in stores, however many knitter prefer to create their own hand dyed yarns to have wide variety of color selection.
Here in this topic I will share my own experience of hand dying techniques. For comparing the result of hand dyed yarns with commercial ready-to-knit yarns click here.
Materials: rather you plan to dye a yarn to ombre with having only two colors, or having more colors in between, the procedure of dying would be the same and you will need to have undyed yarn, food coloring of your choice, a little bit of white vinegar, dying pan and a tong.
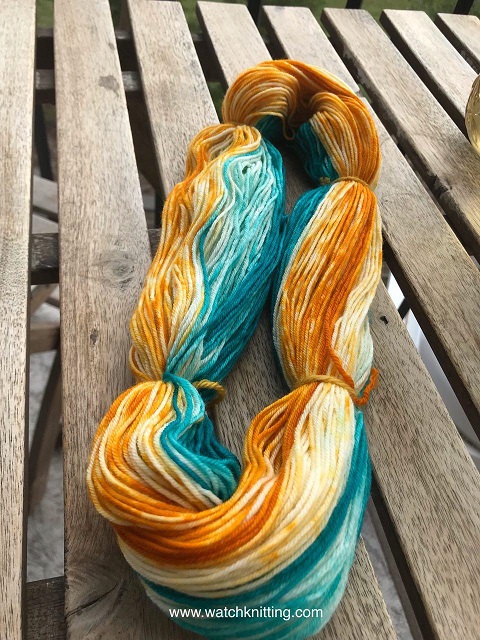
Ombre with two colors: if you looking to ombre a ball of yarn like what you see in the top picture, the process is easier because it involves only two colors. One color is used in one end of the yarn and the other color is used in the other end. Surprisingly the middle part has been ombred by itself because two colors at two end of the yarn has been faded gradually toward the middle part leaving ombre effect on the undyed yarn. The technique is really simple, all you need is to make a ball of your undyed yarn. The important point here is to make sure when you wrap the yarn to ball do not push it hard, let it have room for color to be absorbed. When you made the ball choose a pan that will fit your ball and the water will cover the entire ball. Add water to the pan and let it steam, but do not boil it. You need to wait until the steam is coming out of water. During this time you wash the ball with locum water, or you can soak it in water for a while to make sure it is all wet. When the water is warm enough, turn the heat to low and add about 1/4 tbs of your food coloring of your choice, mix it well, then add two table spoon of white vinegar and then put the ball of undyed yarn inside the pan. Depending on how deep you want your color to be you can add more color later. The outer part of the ball will absorb the color more while the inner part will absorb less, and that is the reason you get the ombre effect. Pay attention that the heat should be enough to have steam coming out of the pan but not very high to boil it. Check the color every half an hour, when you feel that you are satisfied with the color turn off the heat and let it cool gradually. This step also is important because during this time yarn will absorb most of the color. If you are not in rush leave it overnight, then take the ball out of water and squeeze it well under tap water for couple of times, and then wrap the ball other way around to have the outer side inside this time. Again do not make a firm wrap, let it have space between strands and then repeat the same steps with different color. When both ends are dyed completely and left to absorb the color enough, unwrap the yarn and wash it thoroughly with a little bit of detergent and cold water. Be careful not to tangle it. Then leave it to dry. As you will see the two end of the yarn will be darker in color and toward the middle the yarn color changes gradually giving a ombre effect. The picture is my own work of yarn that has been dyed with this technique.
Ombre in palette of colors: as I mentioned above for hand dying techniques you need dying colors. For palette effect of colors you will need colors that are matching in color and you can select as much as you can. One way is to have three level of color mix for each color you choose. For example if you prefer to have gradients of blue in your colors, select three different blue which are matching, or select one blue but add more color to one part, a little less to the second part and use smaller amount of color for the third part. When you decided about your colors you divide the undyed yarn to equal parts in number of colors you have and then dye each part separately. Despite the previous method, here the yarn should be unwrapped to absorb the color perfectly. Like mentioned in previous paragraph, use a dying pan on low heat, add enough water and when the steam is coming out of water add color and a little bit of vinegar, then by the help of a tong put the selected part of the undyed yarn and leave it for 20-30 minutes. Also you can start with brighter side of the gradient and then add more color to the same pan for the next part. When you dyed all parts of the yarn to your desired colors, leave it overnight to let the color be absorbed, then the next day wash it with a little bit of detergent and cold water. The given instruction gives the best result possible, however some people do not make the water warm but it still works, or they use different colors that does not need vinegar.
Technique 2: MULTI STRANDING
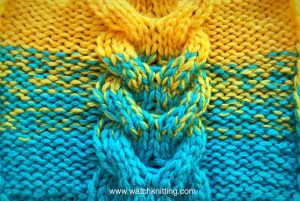
Beside the mentioned technique that involves hand dying techniques there is another way to creates the effects of ombre without the need of dying. In this method, the knitter works with the minimum of three fine strand of yarn at the same time. The easiest way of doing this technique is to have two fine/superfine weight of yarns in different colors. You will need three balls of each color, or you can have one ball of each color and divide it to three smaller balls, depending on what you plan to knit. Start the project by using three strands of color A, and then after working almost one third of the project, cut one of the strands of color A and instead use one strand of color B. Again after knitting for couple of rows cut another strand of color A and instead use the second strand of color B, having enough length with color A and B mixed together, cut the third strand of color A and use third strand of color B and finish the project with three strands of color B. The more strands you use, the more ombre your project gets. In my own experience having five strands of lace weight yarn would get better result. This method involves lots of yarn strands that sometimes makes hassle for knitter, also color selection is limited, however does not involves hand dyeing difficulties. The horseshoe cable shown in the picture has been worked with three strands of fine weight yarn.


Leave a Reply