


Learn how to knit a stunning Baklava Stitch Hat in the round with this step-by-step tutorial. Includes tips for brioche rib brim, stitch count adjustments, and a free unique knitting pattern by Fariba from Watch Knitting.
Hello and welcome! Fariba here from Watch Knitting.
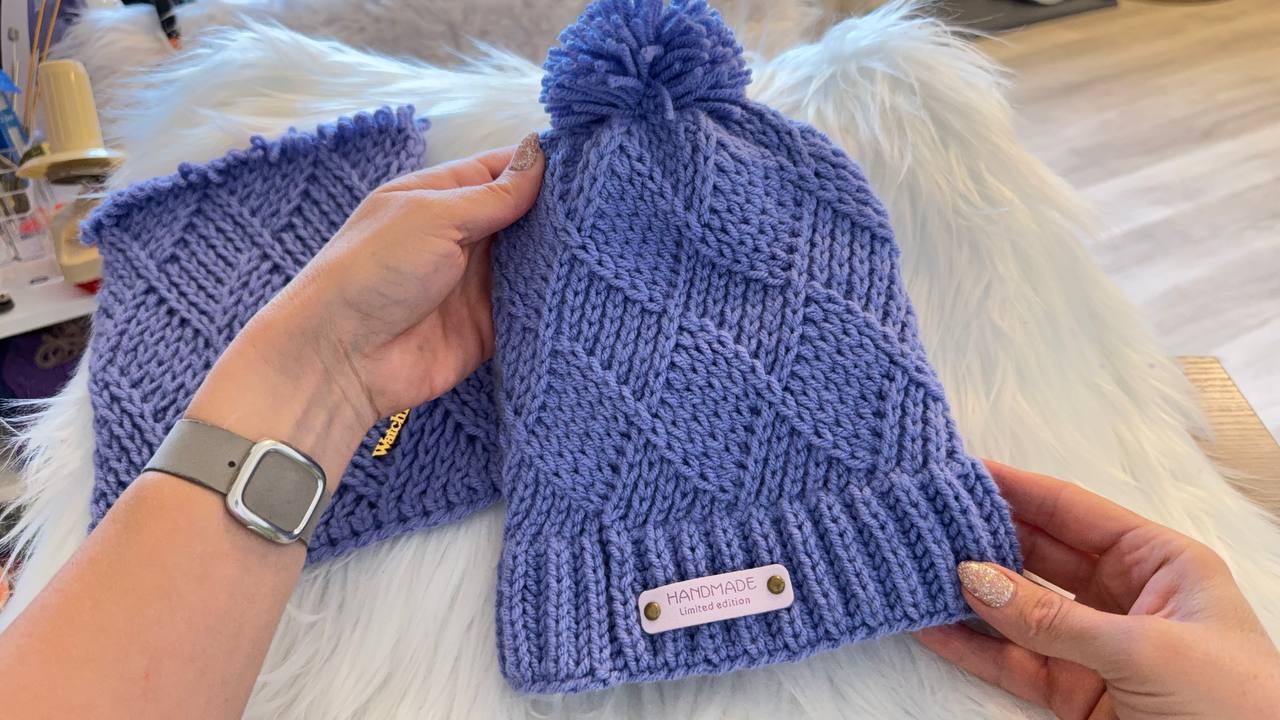
Today I’m sharing a tutorial for my unique Baklava Stitch pattern. The flat version of this stitch is also available on my channel (Click Here). In this video, I’ll focus on working the Baklava Stitch in the round and share tips on how I created the hat sample shown here.
This is an original pattern I designed and shared for free. If you enjoy creative, high-quality knitting tutorials, I’d appreciate it if you subscribe and share the video with your knitting friends. Let’s dive in!
Yarn & Needles
- Yarn: 80g worsted weight yarn (Jean color by Lion Brand)
- Needles: 16″ circular needle, 3.5mm
- Additional tools: Stitch marker (or a loop of scrap yarn), tapestry needle for binding off.
For today’s demonstration, I’m using worsted weight yarn from Loops & Threads. I’ve already worked 2 inches of brioche rib for the brim—it’s reversible, squishy, stretchy, and gives a professional finish. (Full brioche rib tutorial click HERE)
Cast-On Details
- Cast on a multiple of 12 stitches.
- If you’re using brioche rib for the brim, watch my brioche rib tutorial first to adjust your stitch count—otherwise, the brim might end up too loose.
For the Jean color hat, I based my pattern on 108 stitches (starting with 72 stitches for the brioche rib, which increased to 108 after completing the rib section).
For today’s sample (child-size, ~6 years), I cast on 56 stitches, worked 2 inches of brioche rib, and ended up with 84 stitches.
Pattern Overview
- Round 1 and all even-number rounds: Knit.
- We alternate knit rounds with pattern repeat rounds.
- For yarn overs from the brioche rib, I knit through the back loop to reduce hole size.
- Keep your knit stitches loose—pattern rounds tighten the fabric.
The Cross Stitch Pattern
The Baklava Stitch is based on cross stitches, similar to 2-stitch cables, but with my own adjustments:
- Right Cross (C2R): The left stitch crosses over the right stitch (left stitch slipped, right stitch knit).
- Left Cross (C2L): The right stitch crosses over the left (right stitch slipped, left stitch knit).
We start with all right crosses and gradually replace them with left crosses to form diagonal textures.
Pattern Progression (Example)
- Round 1: All C2R (right crosses).
- Round 3: Introduce 1 C2L among 5 C2R.
- Round 6: 4 C2R + 2 C2L.
- Round 8: 3 C2R + 3 C2L.
- Round 10: 2 C2R + 4 C2L.
- Round 12: 1 C2R + 5 C2L.
- Round 14: All C2L.
- Round 16 and beyond: Begin offsetting, switching back gradually to right crosses.
(Full instructions continue with repeats as shown in the video.)
Binding Off the Hat
Once the hat measures about 20 cm, I begin decreasing:
- Round A: Knit 2 together (through the back loop) around—stitch count halves.
- Round B: Knit 2 together again—stitch count halves again.
- Cut the yarn (~30–40 cm tail), thread it through all remaining stitches using a tapestry needle, and pull tight.
- Weave in ends and close any holes by stitching back and forth.
- Add a pom-pom for a fun finish!
Final Words
I hope you enjoyed this Baklava Stitch hat tutorial and found it helpful.
I always try to create easy-to-follow and beginner-friendly tutorials that are clear and creative.
Thank you for watching and supporting my channel! Stay tuned for more knitting patterns and tutorials.

Leave a Reply