


Hello and welcome!
Fariba here with another stitch pattern I designed myself.
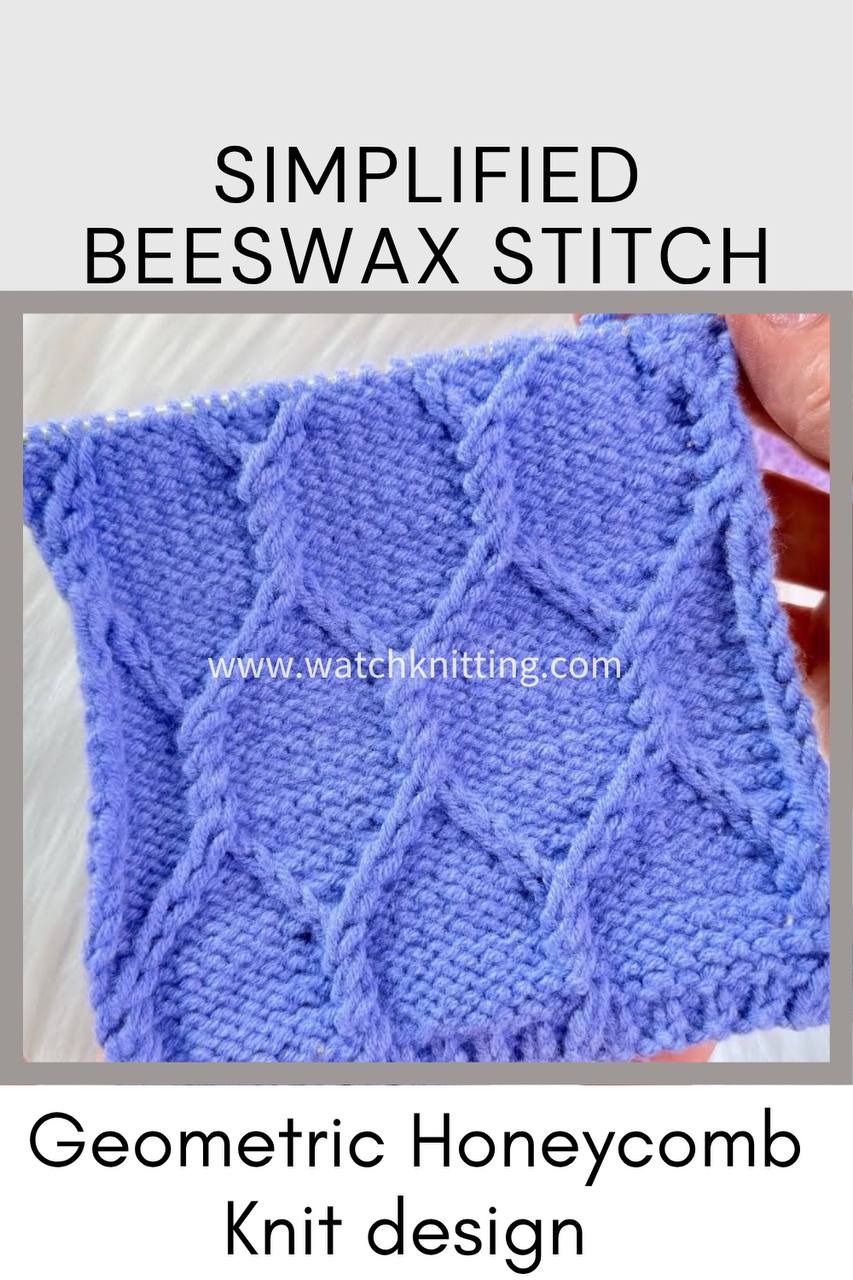
In today’s tutorial, I’ll walk you through how to knit the Simplified Beeswax pattern — a beautifully textured design inspired by classic beeswax and honeycomb motifs.
About the Pattern
The Simplified Beeswax pattern is worked over a multiple of 10 stitches, plus 2, and then plus 2 edge stitches. It follows a 32-row repeat. Some rows share the same structure, reducing the number of unique shaping rows to just 10.
Return rows are worked as the stitches appear—which means you knit the knit stitches and purl the purl stitches.
Texture and Stitch Techniques
To create the distinctive texture, I use a crossing or twisting technique over two stitches:
- In the vertical lines, I only cross to the right using slip and knit (C2R-K).
- In the angled sections, I cross both left and right using slip and purl combinations.
Each full repeat consists of 10 pattern stitches + 2 extra, worked over 32 rows.
Materials Used
- Yarn: Medium weight (#4)
- Needles: 2.5 mm for the sample
- Demo Needles: 3 mm for better visibility
- Cast-on: 24 stitches (2 repeats + 2 edge stitches)
- Optional: I worked 2 rows of ribbing for a cleaner start, but this is not part of the actual pattern.
Full Pattern Chart
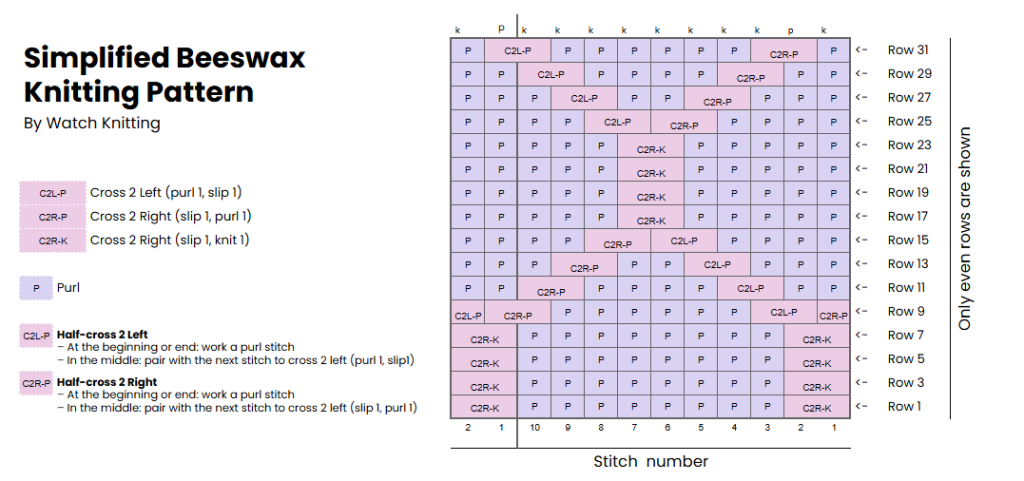
Cross 2 Right with Knit (C2R-K)
- Slip two stitches to the right needle.
- With the yarn held at the back, insert the left needle into the second stitch (originally on the right).
- Carefully remove the right needle to let the first stitch drop.
- Pick up the dropped stitch with the right needle.
- Now the stitches are crossed:
- The front stitch (leaning right) is slipped.
- The back stitch is knit.
Cross 2 Right with Purl (C2R-P)
- Slip two stitches to the right needle.
- With the yarn held at the back, insert the left needle into the second stitch (originally on the right).
- Carefully remove the right needle to let the first stitch drop.
- Pick up the dropped stitch with the right needle.
- Now the stitches are crossed:
- The front stitch (leaning right) is slipped.
- The back stitch is purled.
Cross 2 Left with Purl (C2L-P)
- Slip two stitches to the right needle.
- Grab the right stitch from the front (unlike the right cross).
- Insert the left needle into the right stitch from the front and let the other stitch drop.
- Pick up the dropped stitch and return it to the left needle.
- Now:
- The front stitch is slipped (leaning left).
- The back stitch is purled.
Row Breakdown
Rows 1–8: Vertical Line Setup
- Work C2R-K at the start and end of each 10-stitch segment, with P8 in between.
- Return rows: K the knits, P the purls and slipped sts.
Rows 9–16: Forming the Angled Lines
- Begin alternating C2L-P and C2R-P to create diagonal shapes.
- Gradually reduce the number of center purls and bring the two lines closer together until they meet.
Rows 17–24: Reverse Diagonal
- Start shaping angles in the opposite direction.
- Resume C2R-K to transition from angles back to verticals.
Rows 25–32: Offset Mirror
- Work C2R-P and C2L-P again to mirror the original angle section.
- These rows finalize the full 32-row repeat and restore symmetry.
Row Instruction
32 Row Repeat (Multiple of 10 + 2 + 2 edge sts)
Row 1, 3, 5, 7 (RS): edge, rep [(C2R-K), P8], (C2R-K), edge
Row 2, 4, 6, 8 (WS): edge, P2, rep [K8, P2], edge
Row 9 (RS): edge, P1, rep [(C2L-P), P6, (C2R-P)], P1, edge
Row 10 (WS): edge, K2, rep [P1, K6, P1, K2], edge
Row 11 (RS): edge, rep [P2, (C2L-P), P4, (C2R-P)], P2, edge
Row 12 (WS): edge, K2, rep [K1, P1, K4, P1, K3], edge
Row 13 (RS): edge, rep [P3, (C2L-P), P2, (C2R-P), P1], P2, edge
Row 14 (WS): edge, K2, rep [K2, P1, K2, P1, K4], edge
Row 15 (RS): edge, rep [P4, (C2L-P), (C2R-P), P2], P2, edge
Row 16 (WS): edge, K2, rep [K3, P2, K5], edge
Row 17, 19, 21, 23 (RS): edge, rep [P5, (C2R-K), P3], P2, edge
Row 18, 20, 22, 24 (WS): edge, K2, rep [K3, P2, K5], edge
Row 25 (RS): edge, rep [P4, (C2R-P), (C2L-P), P2], P2, edge
Row 26 (WS): edge, K2, rep [K2, P1, K2, P1, K4], edge
Row 27 (RS): edge, rep [P3, (C2R-P), P2, (C2L-P), P1], P2, edge
Row 28 (WS): edge, K2, rep [K1, P1, K4, P1, K3], edge
Row 29 (RS): edge, rep [P2, (C2R-P), P4, (C2L-P)], P2, edge
Row 30 (WS): edge, K2, rep [P1, K6, P1, K2], edge
Row 31 (RS): edge, P1, rep [(C2R-P), P6, (C2L-P)], P1, edge
Row 32 (WS): edge, K1, rep [P1, K8, P1, K1], edge
Final Thoughts
That’s it for the Simplified Beeswax Knitting Pattern!
This stitch creates a structured, dimensional texture that works beautifully for scarves, blankets, or panels in larger garments. Whether you’re exploring beeswax textures or love stitch-based illusions, this one is a great addition to your knitting repertoire.
If you have any questions about the pattern or technique, feel free to leave a comment. I always enjoy reading your thoughts and feedback.
Thank you so much for following along—and stay tuned for more stitch tutorials from me!
Warmly,
Fariba
WatchKnitting
#BeeswaxPattern #HoneycombKnitting #TexturedKnitting #KnittingTutorial #WatchKnitting #بافتنی #الگوی_بافتنی #örgüdeseni #kumsaatideseni

Leave a Reply