


Welcome back to WatchKnitting! I’m Fariba, and today I’m sharing a beautiful and deeply textured Japanese Wave Knitting Pattern that is both reversible and versatile—perfect for scarves, shawls, sweaters, or modern knitwear designs.
This stitch pattern is inspired by the gentle motion of ocean waves, commonly seen in Japanese textiles. With its shifting vertical ridges, it creates a flowing effect across your fabric that feels elegant, rhythmic, and sculptural.
✨ Pattern Overview
- Stitch Multiple: 12 + 3
- Row Repeat: 24 rows (plus 2 set-up rows)
- Type: Textured, Reversible
- Skill Level: Adventurous Beginner / Intermediate
The fabric is created using half fisherman’s rib as a base, featuring K1B (knit 1 below) and P2TOG (purl two together) to add compression and stretch, while the directional shift comes from strategically placed M1P and M1K increases.
🔁 How the Pattern Works
The design starts with two base rows to set up the rib. Then, over 24 rows, it shifts the wave ridge across the fabric using a mix of:
- K1B (knit one below) to create deep ridges
- P2TOG (purl two together) for compression
- M1P and M1K to balance shaping and continue the wave
All wrong-side rows are worked as stitches appear, which means you simply knit the knits and purl the purls—a great technique for developing muscle memory and stitch recognition.
Each repeat starts with 5 half fisherman’s rib sections and ends with 2 purl stitches.
Over 22 rows, these two purls shift one step to the left via P2TOG, while new stitches are added to the right using M1K or M1P. This shaping builds the flowing wave pattern.
🧶 Instruction
Setup Rows (worked once):
Setup Row 1: edge, rep [(K1, P1) × 5, P2], K1, edge
Setup Row 2: edge, P1, rep [K2, (K1, P1) × 5], edge
Repeating rows:
Row 1: edge, rep [(K1b, P1) × 5, P2], K1b, edge
Row 2: edge, P1, rep [K2, (K1, P1) × 5], edge
Row 3: edge, rep [(K1b, P1) × 5, P2tog, M1P], K1b, edge
Row 4: edge, P1, rep [K2, (K1, P1) × 5], edge
Row 5: edge, rep [(K1b, P1) × 4, K1b, P2tog, P1, M1K], K1b, edge
Row 6: edge, P1, rep [P1, K2, P1, (K1, P1) × 4], edge
Row 7: edge, rep [(K1b, P1) × 4, P2tog, P1, K1b, M1P], K1b, edge
Row 8: edge, P1, rep [K1, P1, K2, (K1, P1) × 4], edge
Row 9: edge, rep [(K1b, P1) × 3, K1b, P2tog, P1, K1b, P1, M1K], K1b, edge
Row 10: edge, P1, rep [(P1, K1) × 2, (K1, P1) × 4], edge
Row 11: edge, rep [(K1b, P1) × 3, P2tog, (P1, K1b) × 2, M1P], K1b, edge
Row 12: edge, P1, rep [K1, (P1, K1) × 2, K1, (K1, P1) × 3], edge
Row 13: edge, rep [(K1b, P1) × 2, K1b, P2tog, (P1, K1b) × 2, P1, M1K], K1b, edge
Row 14: edge, P1, rep [(P1, K1) × 3, (K1, P1) × 3], edge
Row 15: edge, rep [(K1b, P1) × 2, P2tog, (P1, K1b) × 3, M1P], K1b, edge
Row 16: edge, P1, rep [K1, (P1, K1) × 3, K1, (K1, P1) × 2], edge
Row 17: edge, rep [(K1b, P1), K1b, P2tog, (P1, K1b) × 3, P1, M1K], K1b, edge
Row 18: edge, P1, rep [(P1, K1) × 4, (K1, P1) × 2], edge
Row 19: edge, rep [(K1b, P1), P2tog, (P1, K1b) × 4, M1P], K1b, edge
Row 20: edge, P1, rep [K1, (P1, K1) × 4, K1, (K1, P1)], edge
Row 21: edge, rep [K1b, P2tog, (P1, K1b) × 4, P1, M1K], K1b, edge
Row 22: edge, P1, rep [(P1, K1) × 5, K1, P1], edge
Row 23: edge, rep [P2tog, (P1, K1b) × 5, M1P], K1b, edge
Row 24: edge, P1, rep [K1, (P1, K1) × 5, K1], edge
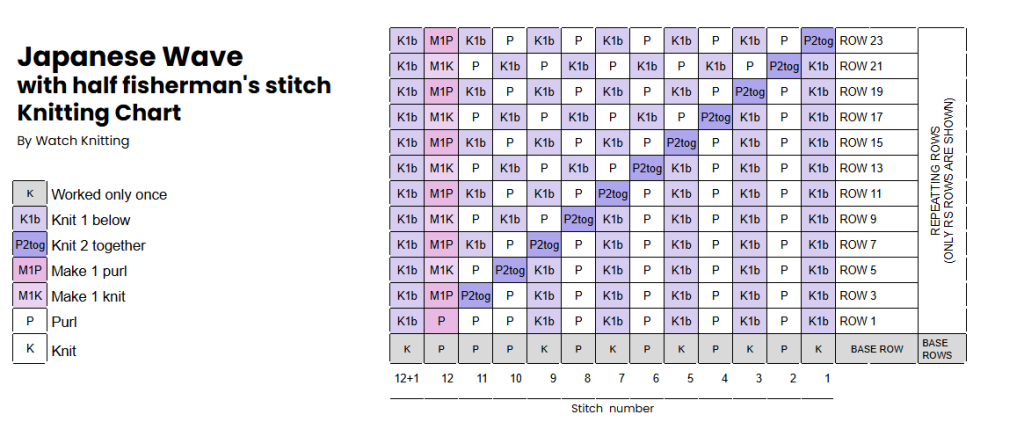
🔑 Key Techniques Used
K1B – Knit 1 below: Insert the right needle into the stitch one row below the next stitch on the left needle and knit it.
M1K – Make 1 knit: Pick up the horizontal strand between two stitches from front to back and knit into the back of this strand.
M1P – Make 1 purl: Pick up the horizontal strand from back to front and purl into the front of the strand.
✨ Pro Tips
- Always purl one stitch right after every P2tog.
- When you see 3 purl stitches, purl the first two together. (This applies to all rows except Row 1.)
- When there are only 2 purl stitches, purl two together by combining 1 purl stitch with 1 knit stitch.
🧶 Materials I Used
To demonstrate this pattern, I knitted two swatches:
- Worsted weight yarn with 4.0 mm needles
- Fingering weight yarn with 3.0 mm needles
For the step-by-step video tutorial, I used Category 4 worsted yarn and 3 mm needles to highlight the stitches clearly on camera.
📽️ Watch the Full Tutorial
You can follow the full step-by-step instructions in my YouTube video below, where I walk you through every row and technique with close-up visuals:
📋 Why You’ll Love This Pattern
- Reversible: Both sides look great—no wrong side!
- Textured: Raised wave motifs create visual depth.
- Stretchy & Soft: Thanks to the half fisherman’s rib structure.
- Modern Aesthetic: Ideal for contemporary knits.
- Customizable: Use it for scarves, cowls, blankets, or garment panels.
The rhythm of this stitch pattern makes it very satisfying to knit, especially once you understand how the stitch count shifts to form the diagonal wave.
🧵 Pattern Uses and Project Ideas
This pattern is perfect for:
- Reversible scarves or cowls (no curling edges)
- Sweater panels or sleeves
- Throws and baby blankets
- Home décor like cushion covers
Because of its firm yet flexible structure, it drapes nicely without losing shape—especially when blocked gently.
🧷 Tips for Success
- Use smooth, solid-colored yarn to show the texture clearly.
- No need for a stitch counter or row tracker—follow pro tips
- Practice K1B and M1P/M1K if you’re new to them—they become second nature with repetition.
- If unsure whether you’re on the right side, check the yarn tail: if it’s on your right, you’re on a K1B row.
🔖 Save & Share
If you enjoyed this pattern, don’t forget to:
- Pin it to Pinterest
- Share your work on Instagram with the hashtag #WatchKnitting
- Subscribe to my YouTube channel for weekly stitch tutorials!
💬 I’d love to see your projects—tag me @WatchKnitting or leave a comment below!
📚 More Patterns You’ll Enjoy
HalfFishermansRib #k1b0 #TexturedKnitting #KnittingTutorial #WatchKnitting #M1k #M1P #ScarfPattern #GeometricKnitting #örgüdeseni #tejido #KnitDesign #FaribaKnits #wavepattern
Happy knitting,
Fariba
WatchKnitting


Leave a Reply