


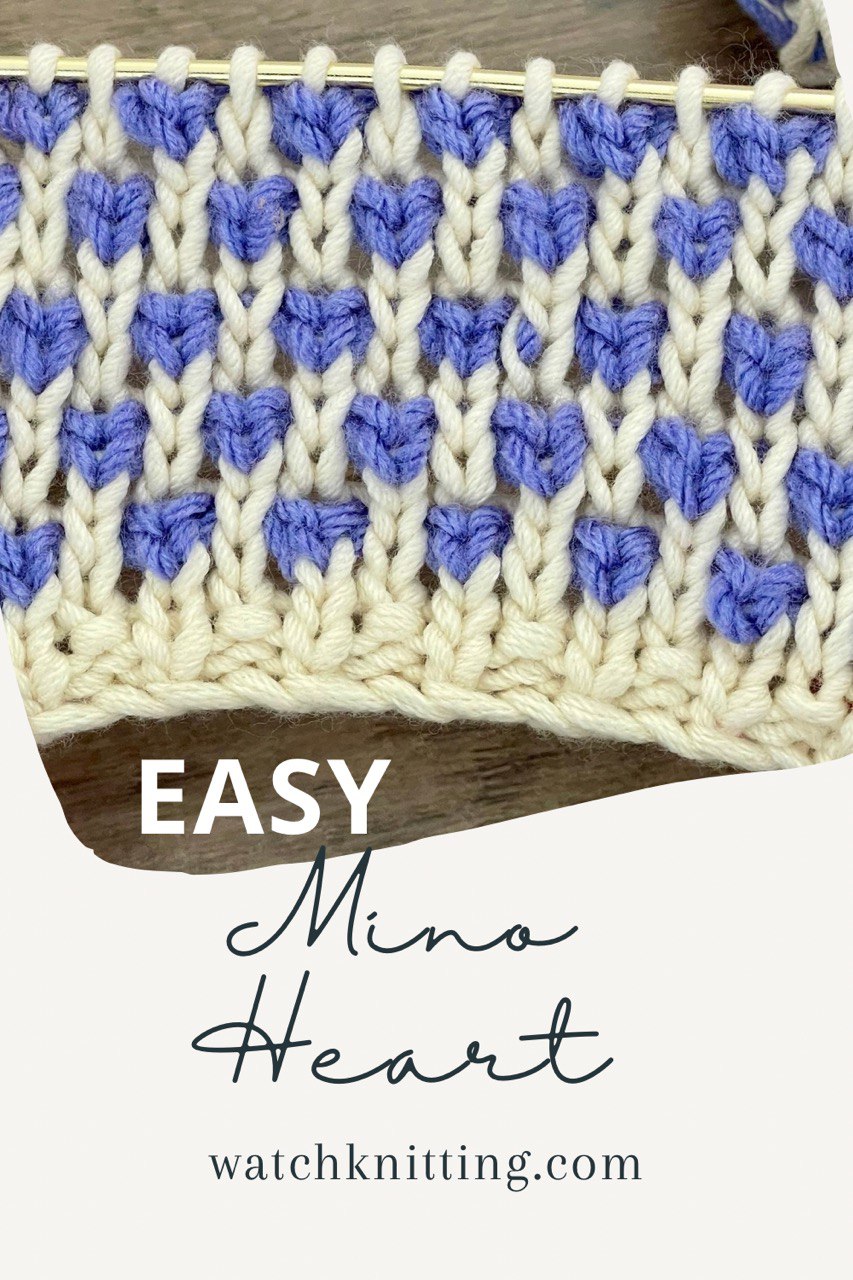
Mini Heart Two-Color Knitting Pattern Tutorial
Welcome, fellow knitters! Fariba here from WatchKnitting.com, and I’m excited to share with you a charming two-color mini heart pattern. This simple yet beautiful design is worked in a multiple of 2+1 stitches and completed over 8 rows, with hearts shaped in rows 4 and 8. The rest of the pattern follows a straightforward sequence.
Materials:
- Worsted weight yarn
- 3.5 mm straight knitting needles
Step 1: Cast On & Set-Up
Start by casting on 19 stitches. Knit two rows in a rib pattern using the background color. Although this set-up isn’t part of the repeat, it helps create a neater edge finish, so I recommend including it.
Step 2: Row 1 (Background Color)
For Row 1, use the background color, which will be the wrong side of the pattern. Work this row entirely in purl stitches.
Edge stitches: At the beginning of each row, always slip the first stitch—except when changing colors, in which case, knit the first stitch. At the end of the row, knit the last stitch, even on purl rows.
Step 3: Row 2 (Second Color)
Switch to the second color for Row 2. Hold the new yarn alongside the background color and knit all stitches across this row. From this point forward, the color will change every two rows, establishing the pattern’s flow. This row, along with the next, will lay the groundwork for shaping the hearts.
Step 4: Row 3 (Background Color)
Purl across Row 3 to return to the starting point. In the first three rows, we’re essentially preparing the base—one row with the background color, followed by two rows with the second color—before shaping the hearts in Row 4.
Step 5: Row 4 (Shaping the Hearts)
For Row 4, begin by knitting the edge stitch. Then, repeat the following steps across the row:
- Knit 1, drop the next stitch off the needle, unravel both previous rows done with the second color, and use the tip of the right needle to place everything back on the left needle.
- Knit them together through the back loop.
Your stitches may seem a bit loose at first, but don’t worry—they will settle perfectly as you continue. After completing Row 4, the heart shape will begin to emerge more clearly during the following purl row.
Step 6: Repeat Rows 5-8
Repeat the sequence of working one row with the background color and two rows with the second color. In Row 5 (with the main color), purl across as you did in Row 1. For Rows 6 and 7, switch back to the second color—knit across in Row 6 and purl across in Row 7. This sets up the next section of hearts.
Step 7: Row 8 (Offsetting the Hearts)
For Row 8, using the background color, knit the edge stitch. This time, start by dropping and undoing the stitches, then knit 1. This action will offset the heart pattern from Row 4. Repeat this sequence across the row to finish the repeat.
Step 8: Starting the Repeat
After completing Row 8, start the pattern again from Row 1. To easily remember the sequence: when you see the hearts formed in Row 4, drop and unravel the stitches to create the hearts in Row 8.
This pattern is quick, cute, and ideal for children’s and baby knitting projects! I hope you enjoy this two-color heart pattern in your next project. Don’t forget to like and share with your knitting friends. Happy knitting!


Leave a Reply