


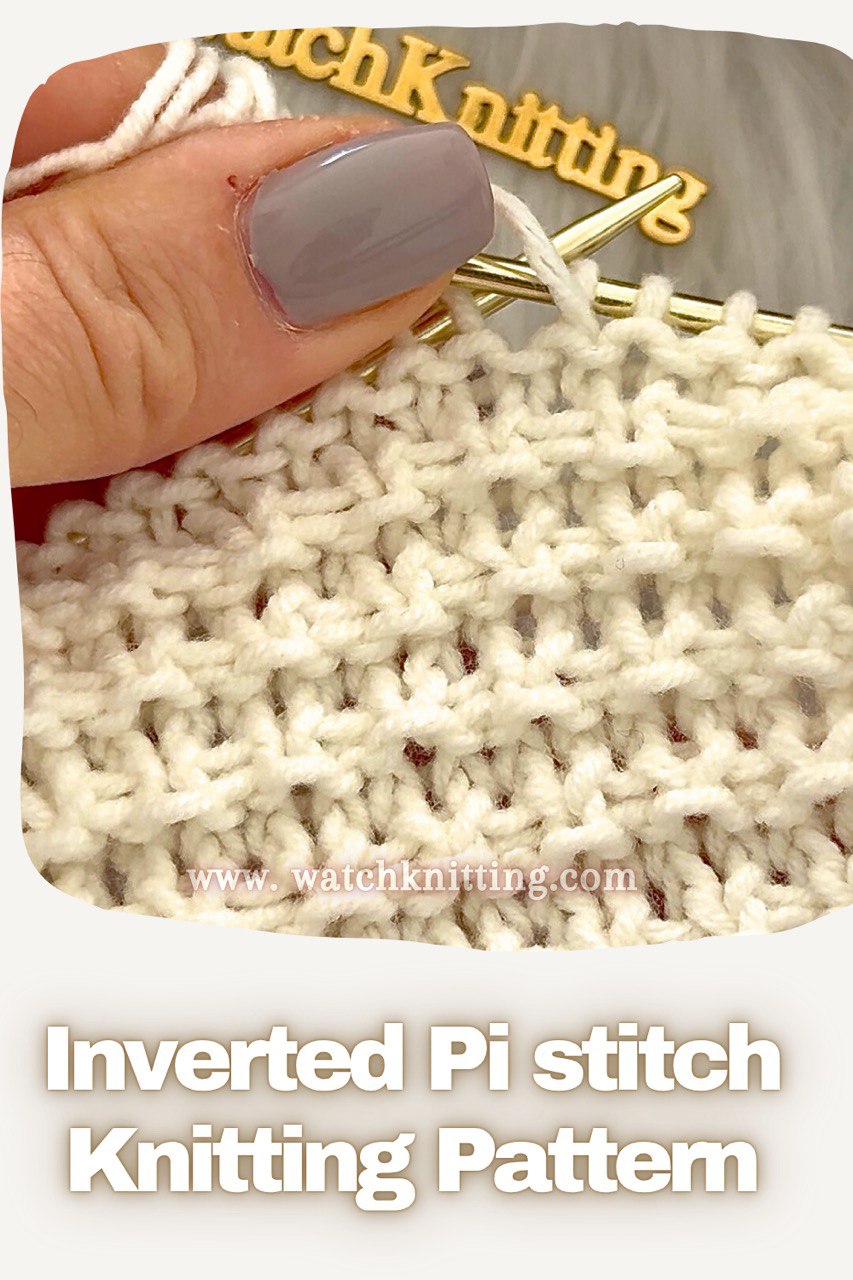
In this tutorial, I’ll show you how to knit the Inverted Pi Stitch — a soft and lightweight fabric with tiny shapes that resemble the Greek letter Pi (π).
This pattern creates a delicate geometric texture, perfect for cardigans, shawls, and lightweight projects.
The technique is super easy, so if you’re a beginner, I highly recommend giving it a try. It also looks especially beautiful when worked with finer yarns, giving the fabric a soft and elegant drape.
Both sides of the fabric look great — it’s almost reversible, which makes it perfect for projects where both sides are visible.
🧵 Pattern Details
- Multiple: 2 + 1
- Repeat: 4 rows
- Sample shown: 15 stitches
- Yarn: fine weight
- Needles: 2.5 mm
🪡 Stitch Abbreviations
- K – Knit
- P – Purl
- SL1 wyif – Slip 1 stitch purlwise with yarn in front
- SL1 wyib – Slip 1 stitch purlwise with yarn in back
📋 Written Instructions
Cast on: a multiple of 2 + 1 stitches (any odd number).
For the sample, I cast on 15 stitches using fine weight yarn and 2.5 mm needles.
Row 1 (RS): Knit
Row 2 (WS): Knit
Row 3 (RS): Edge, [K1, SL1 wyif] repeat to last stitch, K1, edge
Row 4 (WS): Edge, [P1, SL1 wyib] repeat to last stitch, P1, edge
Repeat Rows 1–4 to continue the pattern.
🧶 Tutorial Notes
The pattern starts on the right side. For the edge stitches, I slip the first stitch without knitting and knit the last stitch on every row.
Only for the very first row, I knit the edge stitch instead.
- Rows 1 and 2 form the base — simply knit across.
- Row 3 begins shaping the pattern: knit one, bring the yarn to the front, slip one purlwise — and repeat.
- Row 4 mirrors that on the wrong side: purl one, move yarn to the back, slip one purlwise — and repeat.
After just a few repeats, you’ll see the little Pi (π) shapes appear.
💡 Tips
- The pattern forms beautifully with fine or light yarns.
- If you lose track of rows, check your yarn tail — when it’s on your right side, you’re working Row 1 or Row 3.
- This fabric is reversible — both sides have a neat and tidy texture.
❤️ Final Thoughts
The Inverted Pi Stitch is a simple, elegant, and versatile design you can use for many projects — scarves, cardigans, blankets, or even decorative panels.
I hope you give this stitch a try and share your thoughts in the comments! I love bringing you easy and beautiful knitting ideas every week.
Stay tuned for more tutorials from me — and as always,
have a great day and enjoy your knitting time! 💕

Leave a Reply