


✨ Hey knitters! Fariba here from WatchKnitting 🧶
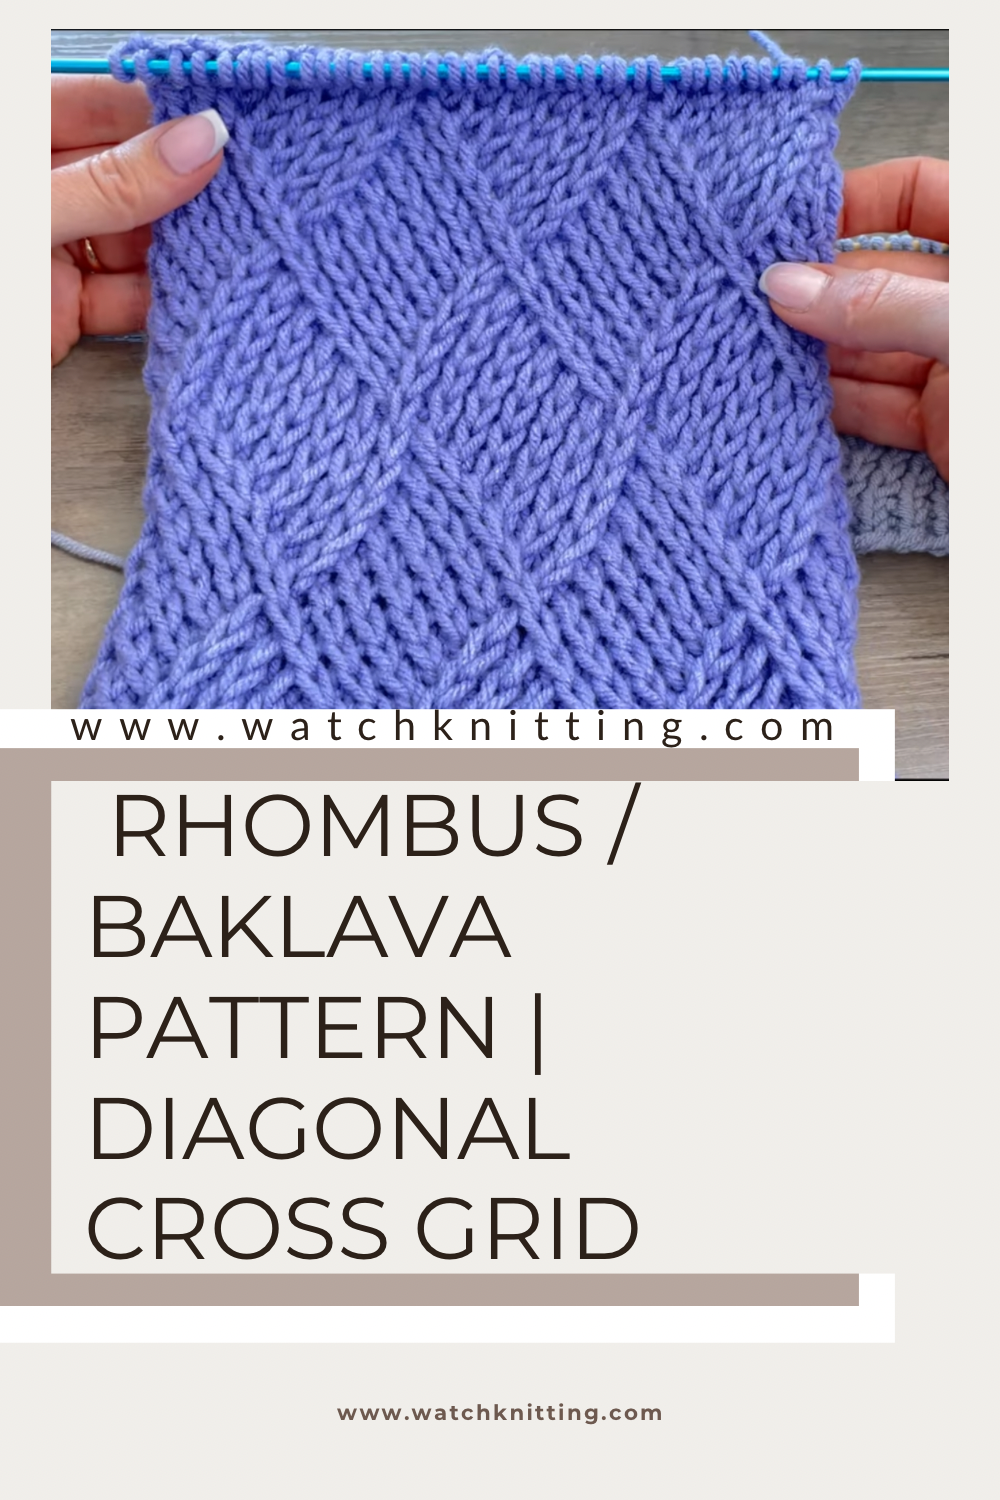
Today we’re diving into the magical rhombus stitch, also known as the diagonal cross line grid pattern! It’s worked over a multiple of 12 + 2 stitches and follows a 24-row repeat—half of which are simple purl return rows.
This stunning texture uses Cross 2 Right and Cross 2 Left techniques, similar to my lattice and chevron patterns. Although it looks complex, once the first 12 rows are set, it becomes much easier to follow—and I’ve made it even simpler with a helpful chart (linked in the video description)!
In this tutorial, I demo the stitch using 26 stitches, worsted weight yarn, and 3.5 mm needles. I walk you through the shaping, step-by-step, showing how each cross gradually transitions to form these beautiful diamond textures.
💡 Whether you’re following the chart or written instructions, stick to one to avoid confusion—each visualizes the pattern slightly differently.
By the end, you’ll be able to confidently knit this elegant, dimensional design. The texture is so satisfying and absolutely worth the effort!
🧶 Save & share if you love mastering new stitches!
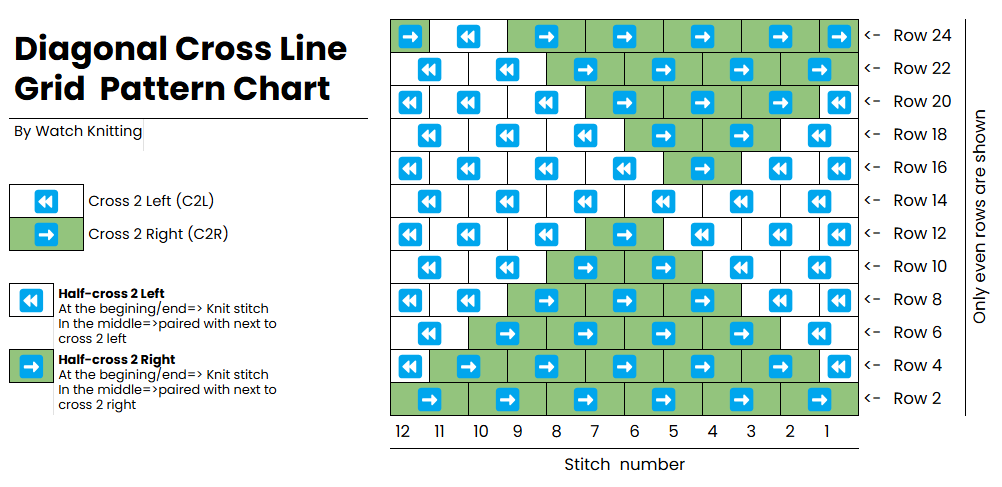
Row 2: Repeat [6× C2R]
Row 4: K1, Repeat [(5× C2R), (1× C2L)], (5× C2R), K1
Row 6: (1× C2L), Repeat [(4× C2R), (2× C2L)], (4× C2R), (1× C2L)
Row 8: K1, (1× C2L), Repeat [(3× C2R), (3× C2L)], (3× C2R), (1× C2L), K1
Row 10: (2× C2L), Repeat [(2× C2R), (4× C2L)], (2× C2R), (2× C2L)
Row 12: K1, (2× C2L), Repeat [(1× C2R), (5× C2L)], (1× C2R), (2× C2L), K1
Row 14: Repeat [6× C2L]
Row 16: K1, (1× C2L), Repeat [(1× C2R), (5× C2L)], (1× C2R), (3× C2L), K1
Row 18: (1× C2L), Repeat [(2× C2R), (4× C2L)], (2× C2R), (3× C2L)
Row 20: K1, Repeat [(3× C2R), (3× C2L)], (3× C2R), (2× C2L), K1
Row 22: Repeat [(4× C2R), (2× C2L)]
Row 24: K1, (4× C2R), (1× C2L), Repeat [(5× C2R), (1× C2L)], K1
🧶 Abbreviation Guide
For C2R, while the yarn is at the back, transfer both stitches to your right needle. Then, insert the tip of your left needle from the back to the first stitch, pulling the right needle out. Drop the second stitch from the needle and pick it up again with your right needle. Now the two stitches are crossed, with the top stitch leaning to the right. Slip the top stitch without knitting and keep it on your right needle. Then, knit the second stitch, which is now at the back.
For C2L, while the yarn is at the back, transfer both stitches to your right needle. Then, using the tip of your left needle, insert it from the front to the second stitch and drop the first stitch from the needle. Pick up the dropped stitch with your right needle and place it back onto the left needle. Now, knit the first stitch (which is now at the back), and slip the second stitch (which is now on top).
#WatchKnitting #KnittingTutorial #RhombusStitch #TexturedKnits #KnittingPatterns #KnitWithMe #BriocheKnitting #C2R #C2L #CreativeKnits #KnittingInspiration #YarnLovers KnittingHat #KnitHatPattern #HandmadeHat #KnittedBeanie #BeanieKnitting #WinterKnitting #KnittingInspiration #KnittingTutorial #HatKnittingPattern #KnittingForBeginners #KnittingLove #KnittingAddict #DIYKnitting #KnittersOfInstagram #KnittingLife #WatchKnitting #WoolHat #KnitAndPurl #KnittingProject #FreeKnittingPattern #ChunkyKnitHat #KnittingDesign #BeginnerKnittingPattern #KnittingIdeas #KnittingJoy #LearnToKnitKnittingHat #KnitHatPattern #HandmadeHat #KnittedBeanie #BeanieKnitting #WinterKnitting #BonnetTricot #ChapeauTricoté #TejerGorro #SombreroTejido #CappelloAiFerr i #BerrettoLavorato #編み物帽子 #вязаниешапка #Strickmütze #TricotMütze #DIYKnitting #KnittingInspiration #HatKnittingPattern #KnittingLife #KnittingLove #KnittingAddict #KnittersOfInstagram #KnittingJoy #FreeKnittingPattern #WatchKnitting #KnittingProject #baklavastitch #rhombus #barfistitch #zigzag #yeg #yegmagazine #canada


Leave a Reply