


Hello friends, Fariba here from the Watch Knitting YouTube channel.
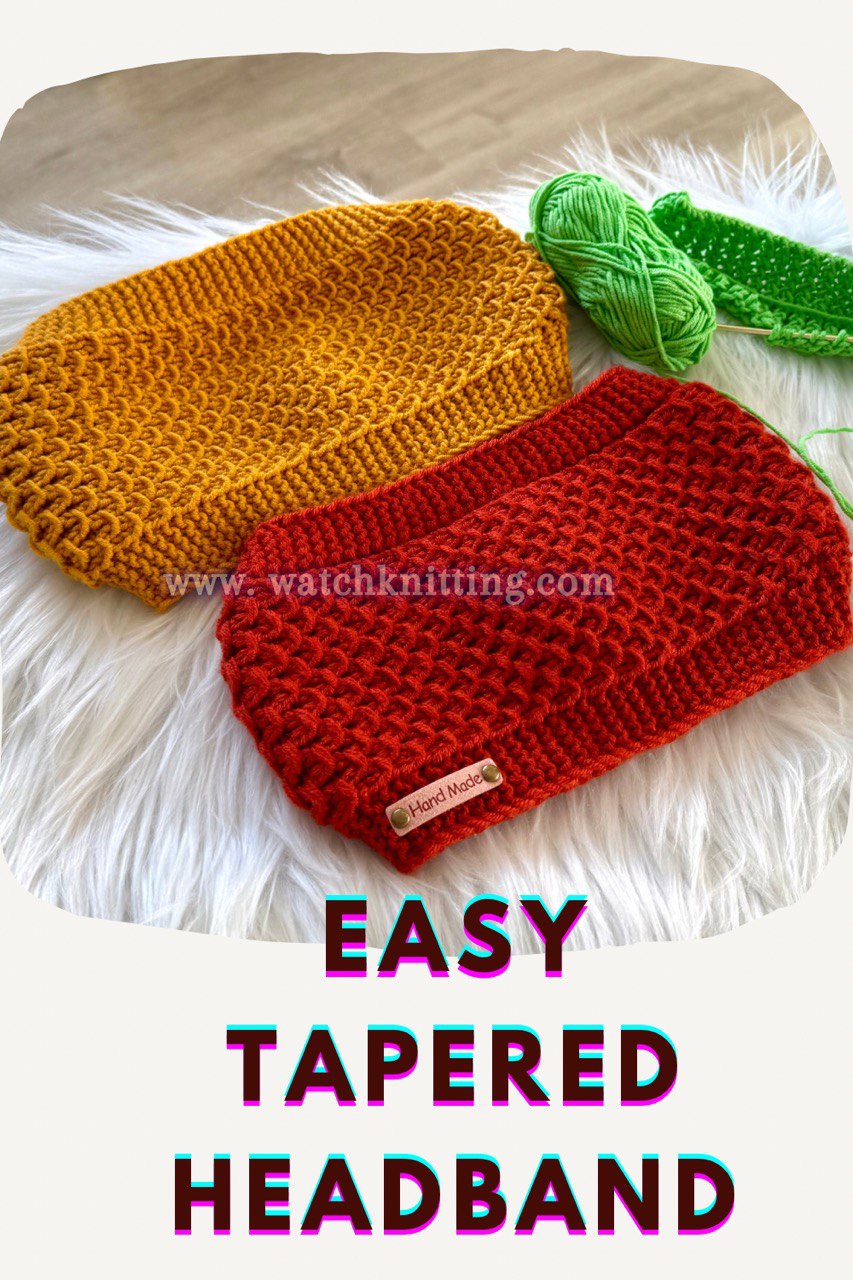
In this video tutorial, I’ll show you how to knit a tapered headband that starts from the back of the head. The headband is narrower at the back and gradually widens as it goes around to comfortably cover the front of the head and the ears.
This pattern is beginner friendly, and if it sounds like something you’d like to try, let’s get started.
Materials Needed
- Worsted weight yarn (approximately 50 grams)
- 2.5 mm knitting needles
- 2 stitch markers (optional, but helpful)
- Scissors
- Measuring tape
Gauge and Base Setup
I begin by casting on 12 stitches and working garter stitch for 2 inches.
Garter stitch means knitting every stitch on both the right side and the wrong side.
This section forms the back of the headband.
If you’re using a different yarn weight or needle size, be sure to adjust your stitch count. For reference, my gauge square measures 2 inches by 2 inches.
Once your base is ready, you can move on to the shaping.
Increasing Section (Shaping the Headband)
At this point, I have 12 stitches on my needle.
I place a stitch marker at the center of the row, dividing the stitches into 6 stitches on each side.
- The 6 stitches will always remain in garter stitch on both sides.
- New stitches will be increased on the right side rows only.
- All return (wrong-side) rows are worked as stitches appear.
For edge stitches:
- Slip the first stitch of the row.
- Knit the last stitch of the row.
Increasing Method
Increases are worked by picking up the strand between stitches and working it as either a knit or purl stitch, alternating between knit and purl increases to create a rib structure, but start with Purl stitch for the first increasing row.
Be sure to work the picked-up stitch in a way that avoids creating holes.
As stitches are added:
- Place stitch markers before and after the newly increased stitch.
- Work the new stitches in rib stitch (K1, P1).
- Continue working garter stitch on side sections.
When you increased the first four stitches, you have enoght stitches to start the pattern.
Pattern Section
Once enough stitches are increased, the textured pattern begins.
The pattern is formed by:
- Working rib stitches
- Creating horizontal strands by temporarily moving the yarn across three stitches
To create the horizontal strand:
- After ribbing four stitches, Bring the yarn to the front.
- Slip the last three stitches from right needle to the left needle.
- Move the yarn to the back.
- Slip the last three stitches back to the right needle.
There is always one purl stitch between each pattern section, which keeps the texture clean and balanced.
Continue working this pattern while increasing until the middle section has 31 stitches.
Straight Section
After finishing all increases:
- The piece should measure about 6 inches wide.
- Work straight without increasing for approximately 9 inches, keeping the same pattern for middle section and garter stitch for sides.
This section forms the main body of the headband.
Decreasing Section
Once the desired length is reached, it’s time to decrease.
- Decrease every other row
- Decrease one stitch on each side (2 stitches total per decrease row)
- Continue until all stitches are decreased in the patterned section
You may use any decrease method you prefer. In this tutorial, I decrease by passing one stitch over another while maintaining the pattern.
Finishing the Headband
After completing the decreases:
- You will have 12 stitches remaining
- Work 2 inches of garter stitch, matching the beginning section
Bind off all stitches (I use a purl-two-together bind-off).
Finally, seam the two ends together to form the headband.
Final Result
Your tapered headband is now complete, with a narrow back, wider front, and beautiful textured detail.
I hope you enjoyed this tutorial.
Stay tuned for more knitting tutorials from my channel, and have a wonderful day.


Leave a Reply