


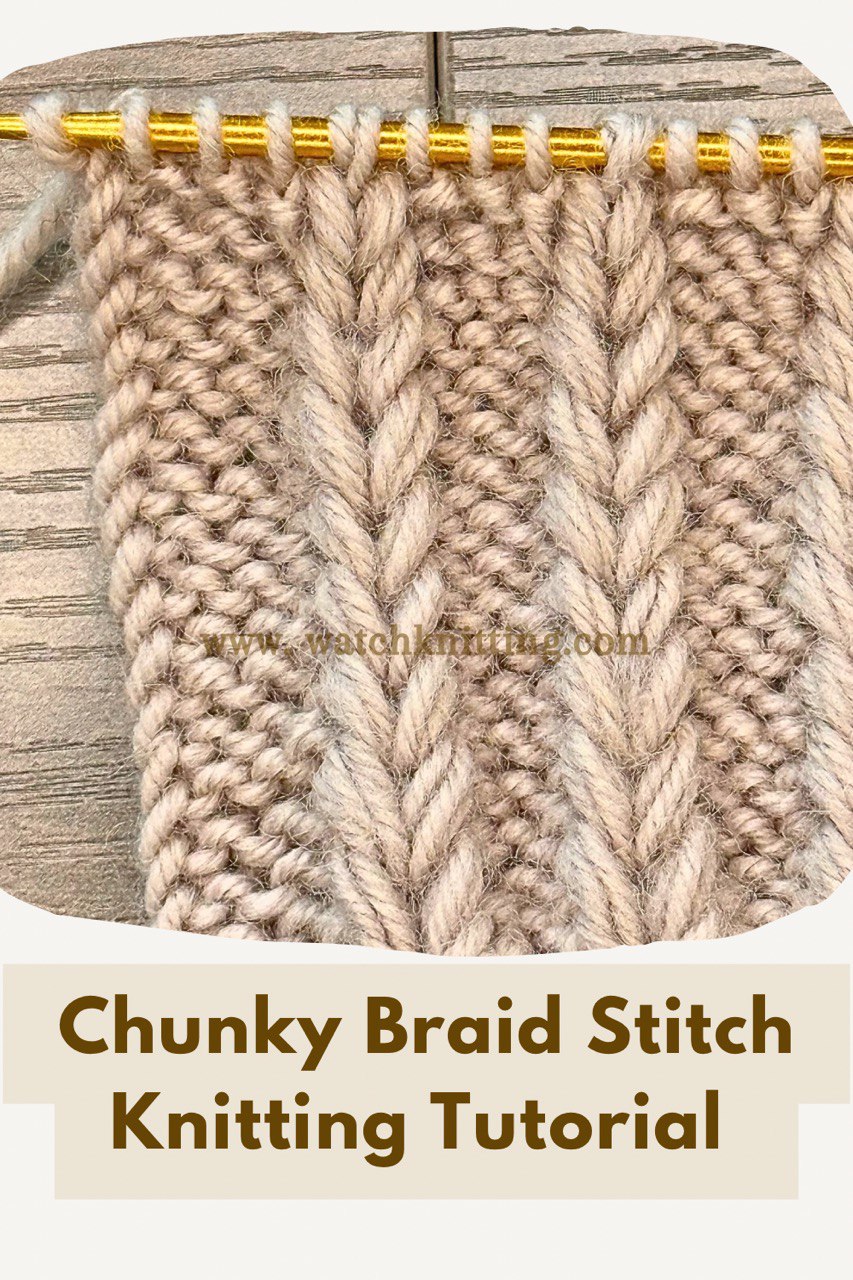
Hello I’m Fariba from Watch Knitting. Today I’m excited to share a cute, textured braid stitch that uses a drop stitch technique. The stitch is worked over a multiple of 4 + 5 stitches and uses a 4-row repeat plus one setup row. It’s an excellent pattern if you want a bold braided texture without complex shaping.
Materials (sample)
- Yarn: Worsted weight
- Needles: 2.5 mm
- Sample cast-on: 17 stitches (gives 3 full repeats with the 2-row ribbed base)
- Base: 2 rows of rib stitch
Quick notes
- The pattern begins with a single setup row on the right side (worked only once).
- For edge stitches: slip the first stitch at the beginning of the row and knit the last stitch at the end.
- This stitch uses a combination of double-knits / double-purls and a drop-and-lift method (drop 1 stitch down 4 rows, then pull that stitch over the loose strands and double knit into it).
How this sample is worked
For the sample in the video I cast on 17 stitches with worsted weight yarn and 2.5 mm needles. I worked two rows of rib stitch as the base; this stitch count gives three full repeats of the pattern. If you’ll be knitting along, prepare your base first.
The pattern begins with a setup row on the right side (worked only once). For the setup row I pick up the edge stitch, then work the next 4 stitches as groups: K3, then DK (double knit into 1 stitch) — repeat across, finishing with K3 and the edge stitch. If you prefer, instead of DK you can double-wrap the yarn around the needle and work a double-knit that way.
Throughout the repeating rows, the stitches that are not part of the doubled stitches are worked as plain knits. The doubled stitches are alternately double-knit and double-purl depending on the row, and on Row 4 you’ll drop a stitch down 4 rows, gather the 4 loose strands onto the needle, pull the stitch over those strands, then double-knit into that stitch to create the braided effect.
Pattern (compact)
Set up row (RS): edge, rep [K3, DK1], K3, edge
Row 1 (WS): edge, rep [K3, DP1], K3, edge
Row 2 (RS): edge, rep [K3, DK1], K3, edge
Row 3 (WS): edge, rep [K3, DP1], K3, edge
Row 4 (RS): edge, rep [K3, Drop 1 st down 4 rows, lift st over 4 strands, DK], K3, edge
Abbreviations
- K = Knit
- P = Purl
- DK = Double Knit (knit twice into the same stitch)
- DP = Double Purl (purl twice into the same stitch)
- RS = Right Side
- WS = Wrong Side
Tips & troubleshooting
- When you drop the stitch down 4 rows, make sure you are lifting exactly the stitch from the needle (not an extra loop) and pick up the four loose strands cleanly so they sit neatly under the stitch before you pull the stitch over them.
- If the braid looks tight after you pull the stitch through the strands, ease the tension by gently tugging the surrounding fabric or try loosening the strands before you pull the stitch back on.
- If you prefer a cleaner double-knit appearance, use the method you feel most comfortable with (knitting into the stitch twice vs. double-wrapping the yarn).
Where to use this stitch
This chunky braid is great for: scarves, blanket panels, textured sweater yokes, cushion covers, and any project where you want a bold, raised braid motif.
Video tutorial
Watch the full step-by-step video on the Watch Knitting channel to follow along as I demonstrate each step and common pitfalls. If you enjoyed this pattern, please like, comment, and subscribe for more stitch tutorials.
Final notes
Repeat the pattern from Row 1 after you finish the initial setup row. Enjoy knitting — and if you have questions or want a written PDF of this pattern, drop a comment and I’ll help you out!
Posted by Fariba — Watch Knitting


Leave a Reply